MAKE YOUR OWN RUGS BY AGNES M. MIALL (EXCERPT) (1938)
MAKE YOUR OWN RUGS BY AGNES M. MIALL
Author of Patchwork Old and New, Easy Ways of Weaving, Complete Needlecraft, Making Home Furnishings, etc.
London. The Woman’s Magazine Office, 4 Bouverie Street, E.C.4
CHAPTER III - RUGS HOOKED ON CANVAS
Rugs in general, and home-made rugs in particular, divide into two main classes - those which have a pile and those which have a flat surface. Both types have their advantages and are specially suited to different needs and rooms. So you should know how to make both and not develop any prejudice for one particular kind to the exclusion of the other. In this and Chapters IV, V and IX you will find instructions for making several varieties of pile rugs, while in Chapters V to VIII and X are described some good ways of making non-pile floor coverings.
PILE RUGS
A pile gives warmth, softness and richness of effect to a rug. It tends to eliminate draughts, an important point in a cold room or when children will be likely to play on it. Generally speaking, too, pile rugs wear longer than the flat kind and do not look shabby as soon. In fact, with many hand-made pile rugs it is almost impossible, however long you use them, to get them even looking threadbare, far less wearing out! These characteristics make pile rugs just right on parquet or linoleum-covered floors, by the bedside and in front of the fire; also in any room, such as lounge or drawing-room, where a rich and handsome appearance is wanted. They are also cosily warm for the floors of cars and it is rather surprising that more home rug-makers don’t turn their skill in this direction. Many pile rugs are hooked on a canvas foundation, and this chapter deals with three variations of these. In each case the way of making is almost exactly the same, but different materials are used.
METHOD 1. - HOOKED ON CANVAS WITH RUG WOOL (FIGS. 4 TO 8)
This is, perhaps, the best known method of all, probably because it is practically foolproof! It is adaptable to all shapes and most types of design.
Tools and Materials Required. A suitable rug hook (price usually about 6d.); a rug gauge (2d.); rug canvas for the foundation; rug wool in the quantities and colours required by the design; hessian or other lining.
There are numerous suitable hooks, each excellent in its way, and it is a matter of individual choice which you use. In Figs. 5 to 7 is illustrated the method of working for Brown’s Rug-making Machine. If you buy a hook of another make, you will find that its particular working instructions are included with it.
The gauge is a grooved piece of wood on which the wool is wound, then quickly cut to uniform lengths by running a pair of scissors along the groove.
Rug Wool. Six-ply rug wool should be used on canvas. It is obtainable in a wide range of colours and is sold in quarter-lb.. hanks. It is best to buy the good qualities, costing round about 4s. per lb. The cheaper makes are much thinner and do not make such substantial rugs. Sometimes wool is ready-cut (see under Rug Gauges, below). Very thick cable wool is occasionally used. In this case hook only into alternate holes in the canvas.
Rug Canvas is a strong cotton canvas with a square mesh, costing from about 8d. to 1s. 11d. per yard, according to its width, which varies from 14 inches (slip mat size) to 36 inches. The mesh usually has about 3-and-a-half holes to the inch each way, for hooked rugs, and blue threads divide it into checks measuring 8 holes each way. This is for convenience of counting when working from a chart. Complete canvases of varying sizes, hemmed each end, may be bought ready stencilled in colours with a design, which has then only to be hooked over with the same colours of wool. When buying canvas by the yard for a charted or original design, choose a width as near as possible to the desired rug width and allow 4 or 5 inches more length of canvas than the rug length, to permit of a good turning each end.
Rug Gauges of the simplest kind, for use with an ordinary pair of scissors, cost about 2d. each. More elaborate ones, provided with a fixed razor-blade or some other form of cutting edge, are a little more expensive. If you are using a ready-cut make of wool (usually sold packed into 2-oz. packets) a gauge will not be needed.
Preliminary Steps. Unless the wool is ready-cut, wind a skein of each colour into a ball. Store these in a box or basket so that they will not roll about, and provide a second smaller one for the cut pieces you will be actually using. With the help of the gauge, stock this with a good supply of cut lengths in each colour. To cut lengths with the ordinary wooden gauge, wind the wool smoothly and tautly over it, all along, not letting any wind overlap the next. Then, holding the last wind in place with the left hand, with the right tun sharp scissors along the groove in the gauge, cutting through every wind at this spot. The result is a number of pieces of wool all exactly the same length, each of which will make one knot in the rug.
Fold in a single turning at least 2 inches deep at each end of the canvas. Now lay the canvas on a solid table with one end projecting a little over the edge towards you. Put your box of cut pieces, ball, gauge and hook handy and you are ready to start making the rug.
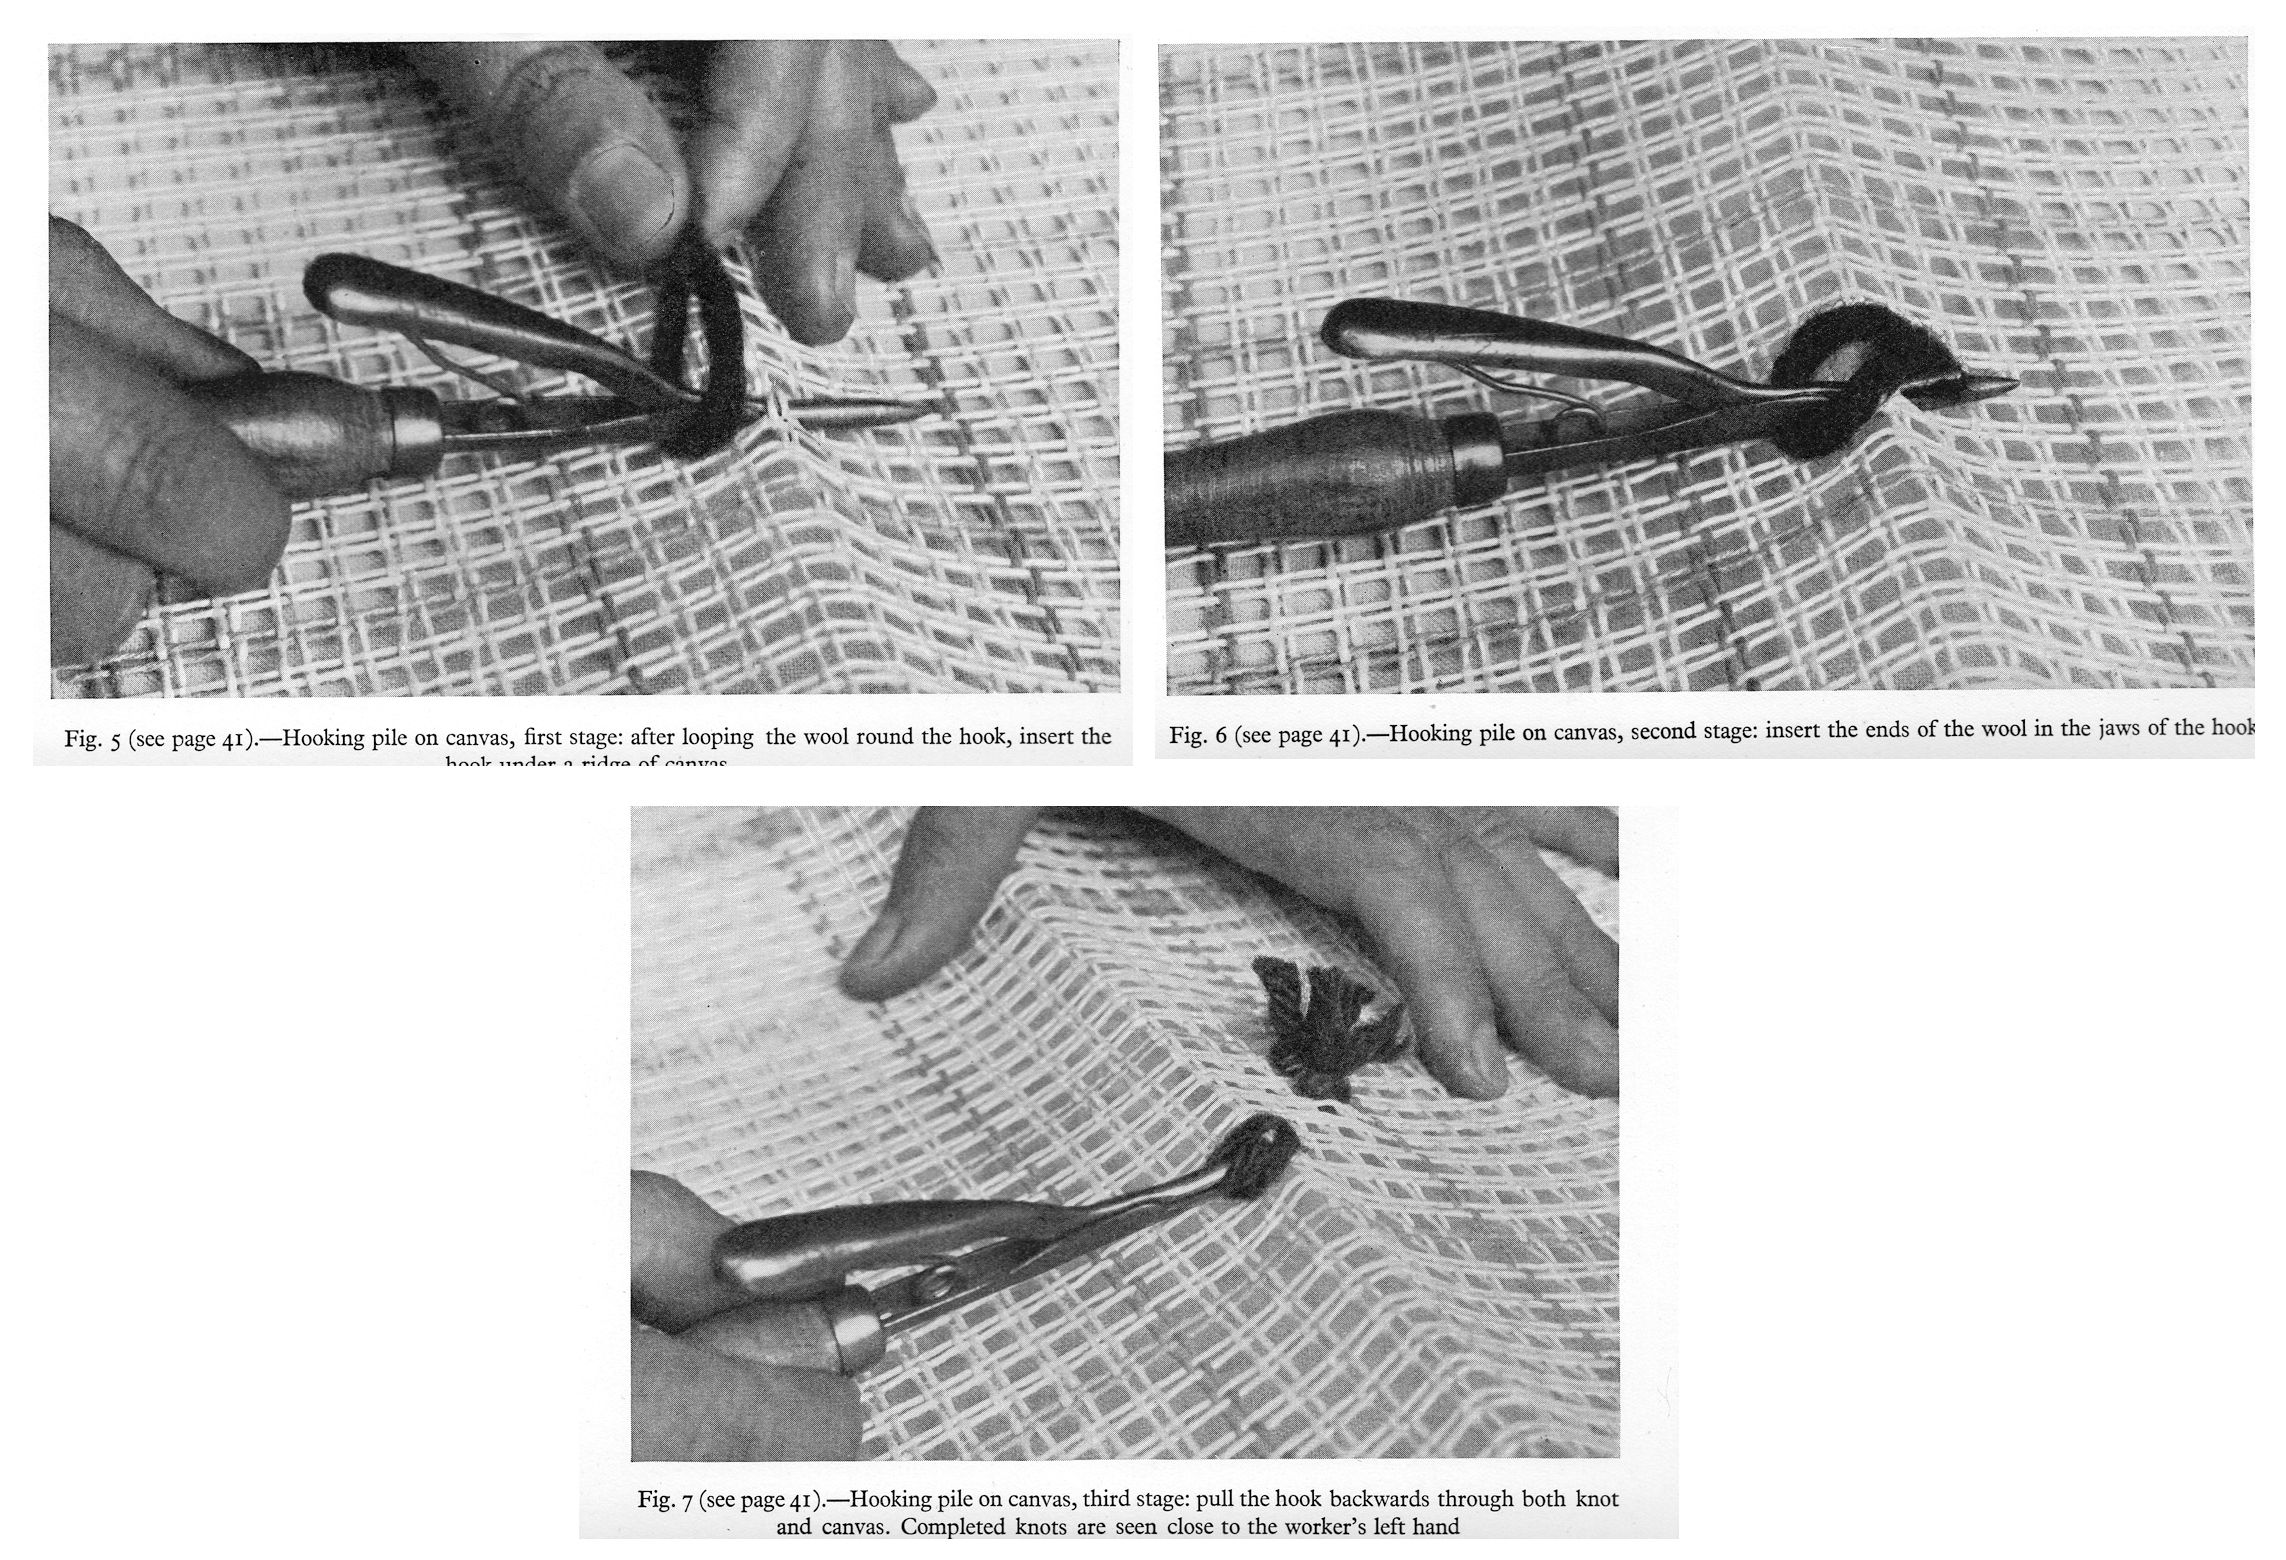
Hooking with Brown's Rug-making Machine (Figs. 5 to 7) For brevity, in the following instructions the machine is referred to as the hook. (For other forms of rug hook, see the note on page 37.) Take a cut length of wool in the left hand and form it into a loop by placing the two ends together. Thrust the hook, held in the right hand, first into the loop and then through a ridge in the canvas which should be slightly humped up, as in Fig. 5. (A ridge is formed by two threads lying close together.) The hook should enter the canvas as far as it will go before the spring arm stops it.
Press down the spring arm; this opens the jaws of the hook. Insert the two ends of wool, drawn level, into the jaw, then let it close (Fig. 6). Complete the knot by pulling the hook (by its handle only, not touching the spring arm) towards you, right through both the loop and the canvas, as you see being done in Fig. 7. When fully through and tweaked upright by the fingers, you will have a firm, finished knot with upstanding ends to form the pile. Two of these completed knots are seen close to the forefinger in Fig. 7.
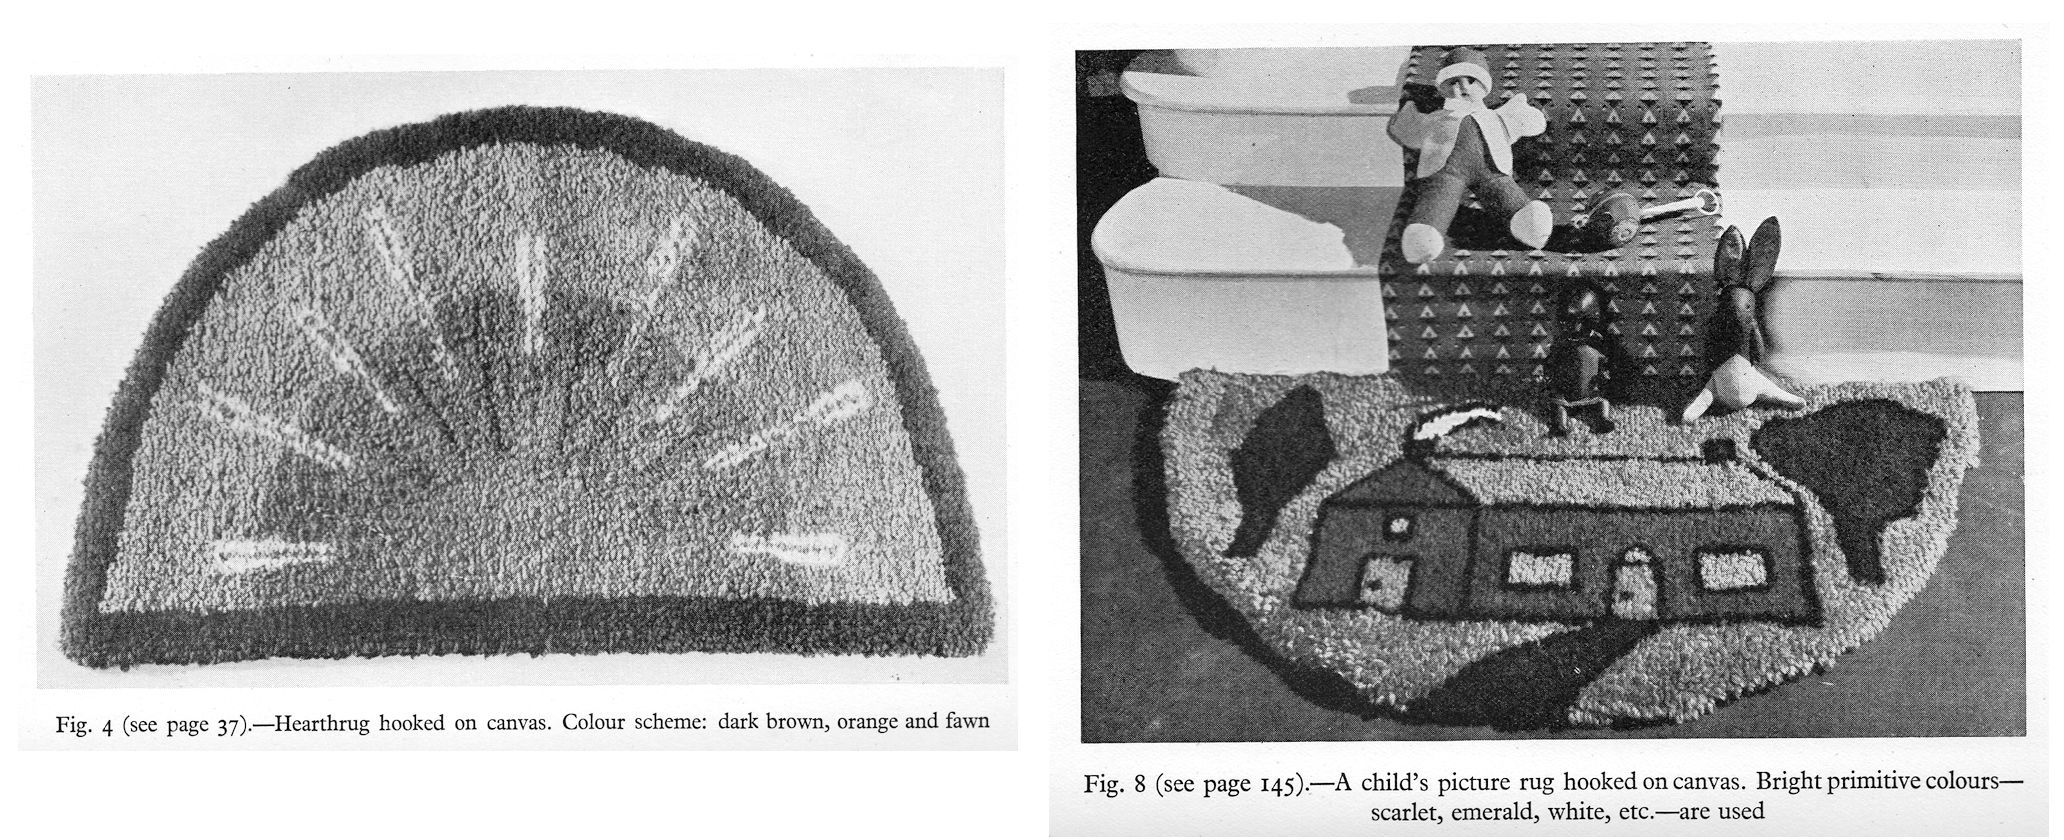
Hook the knots in row by row across the canvas, working the same way all the time. Of course, you must change the colour of wool used in each row as often as the coloured stencil or chart you are using requires it. This adds interest and variety to the work. Unless cable wool is being used, hook a knot into each square of the canvas. On a squared paper chart each square represents one knot. On stencilled canvas, you simply cover each ridge with the same shade as is painted on it. On semicircular (Figs. 4 and 8) or oval rugs, naturally, the rows will vary in length.
For the first two or three and the last two or three rows of the rug you will have a double thickness of the canvas, caused by the turning in of the raw edges. Work these rows through the double thickness. It makes the hooking a bit tough to do but forms a neat and strong edge to each end of the rug. On semicircular or oval rugs do not turn in the canvas double along the curved edges, but leave these to be dealt with later. When the rug is completely hooked, lay it flat on a table, pile upwards, spread your hands out over it and rub out all the loose fluff. So much of this will come away that you will expect your rug to go threadbare at any moment! Don’t worry, it won’t be that after ten years of wear. However evenly you have inserted the wool into the jaws of the hook, you will find some longer ends which stick up, spoiling the level of the pile. Go over the rug with a pair of sharp scissors, cutting these off till the whole surface is smooth and thick.
Lining Hooked Rugs. Some rug-makers merely face all edges of a rug on the wrong side with carpet braid, leaving them otherwise unlined. My experience is that it is better to line them throughout. And this is actually less trouble than facing, for whereas you must go twice round the rug with this finishing method, to hold down each edge of the braid, a lining has only to be secured once all round.
Rug firms (see page 151 for names and addresses) sell stout hessian and a special black canvas for lining rugs, and these give excellent service. Actually, however, any really sturdy, dark-coloured cotton material will serve and you may find you have something suitable in the house; as it does not show, it need not be new. For instance, a skilful rug-maker of my acquaintance uses brown cotton jaspe, at 1s. a yard (really sold for loose covers and curtains) for lining her rugs.
Cut the lining the size of the canvas, plus 1-inch turnings on all edges. Fold in the turnings to fit the canvas, after placing wrong sides of canvas and lining together. Slipstitch the fining down to the canvas edges with strong linen thread.
These remarks about lining apply not only to rugs hooked on canvas but to most other kinds of rugs described in this book, unless otherwise mentioned under the special heading for each.
Fluffing of Hooked Rugs. Hooked and other pile rugs, such as frame-made and prodded ones, fashioned from rug wool, when new fluff out a good deal every time they are shaken or brushed. When this happens, don’t think that you have made them wrongly or bought bad wool. It is a normal and unavoidable process and will cease after a week or two without damaging the looks and wear of the rug.
Method II. - HOOKED ON CANVAS WITH HERDWICK CARDED WOOL (Fig- 9)
The making of hooked rugs from the fleece of Herdwick sheep is an old Cumberland method, lately revived. It is specially interesting to handicraft teachers who like their classes to work right through with their own hands from the raw product to the finished rug or to craftworkers who live in the country and can collect the wool from their own sheep or glean it from hedgerows, passed during country walks. By buying Herdwick Fleece Wool from the address given on page 152, town rug-makers also can use this method, which makes most beautifully soft warm rugs, particularly suitable for the hearth, the bedside and for small children to play on. Owing to their special warmth and thickness, these fleece rugs are also, perhaps, the most ideal known for excluding draughts at badly fitting doors, if they are made up in small sizes as slipmats.
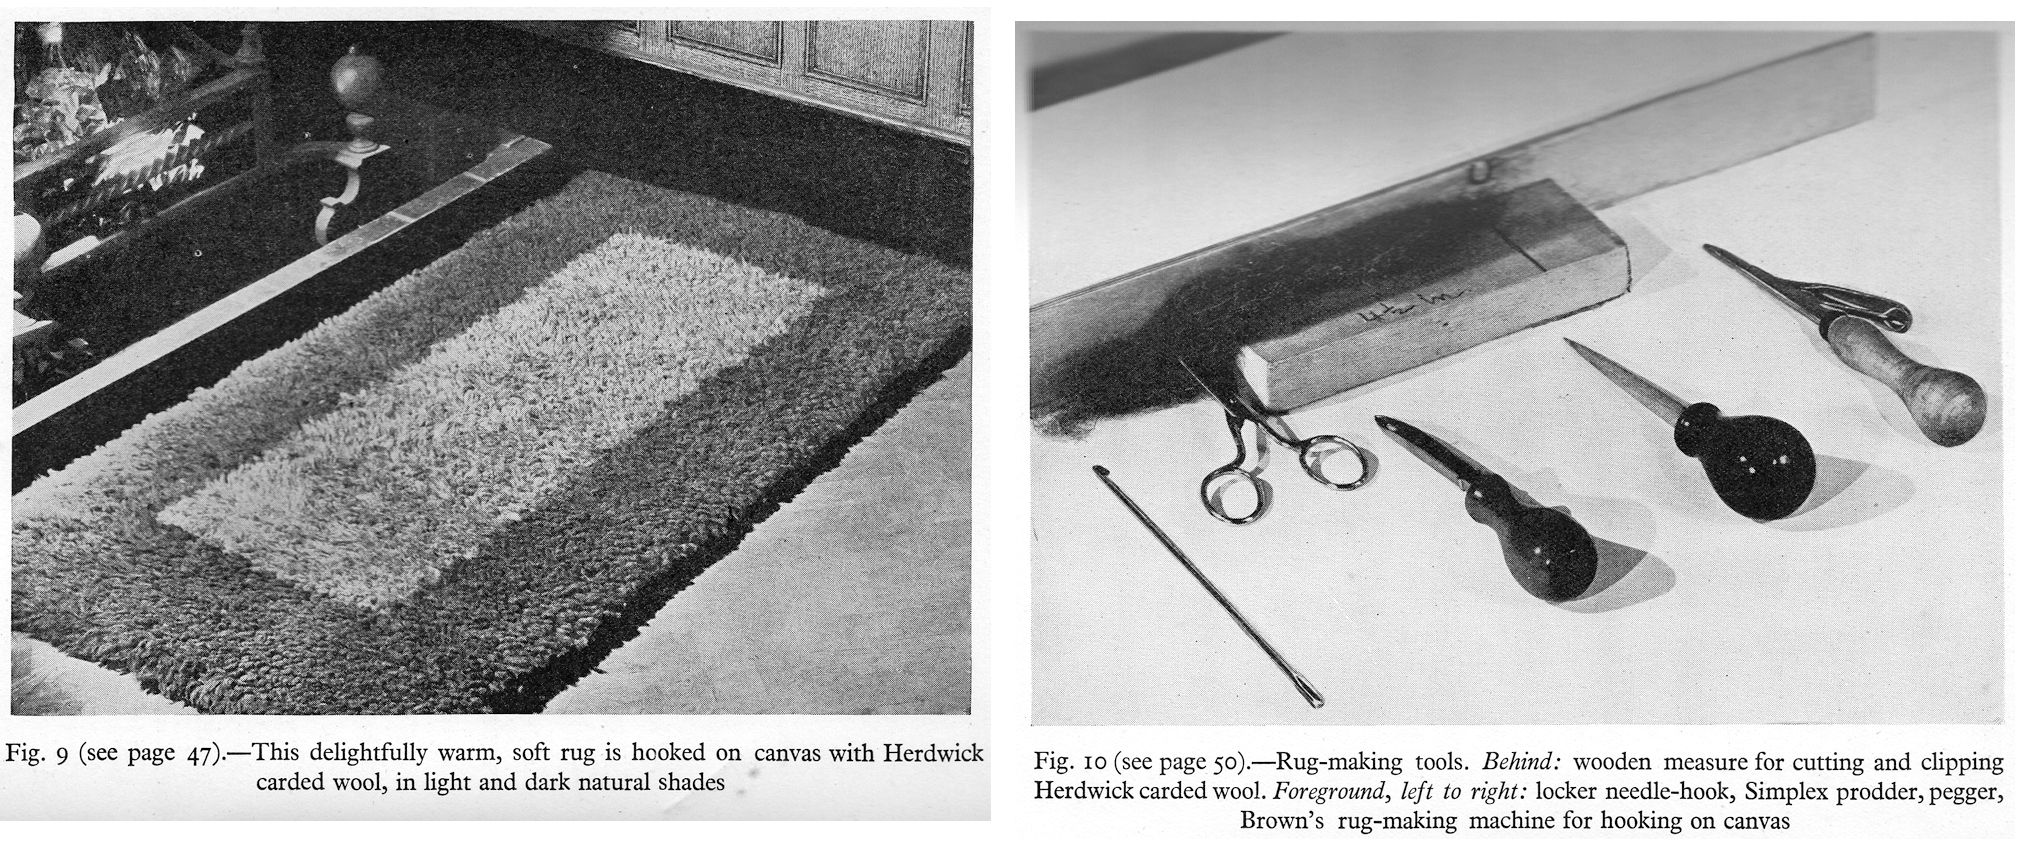
They are quite inexpensive, too. The hearthrug photographed (Fig. 9) measuring 51 by 27 inches, would cost about 18s. Also, as hooking is only into every other hole of the canvas (as with cable wool) fleece rugs are comparatively quick to work. They have the further advantage of being washable. Such rugs have, however, one drawback. Natural, undyed wool only being used, the colours available are limited to those grown by the sheep, which are mainly light and dark greyish-drab, though some off-white and dark brown tints are found, the dark brown coming usually from a first clip. Fortunately such shades all blend charmingly with each other and are just the tones used in many modern furnishing schemes. Avoid putting them in the same room with other neutral colours, such as beige, warm brown or a definite cold grey, as their own tint is mostly a soft drab.
The wool for fleece rugs should, if possible, be Herdwick, not from just any breed of sheep. Herdwicks are small mountain sheep peculiar to the Lake District and the surrounding fells. They have a long, coarse fleece which is harsh and wiry and so especially suited to give the hard wear needed for rugs. Ordinary sheep’s wool may be used in districts where it is very easily obtainable, but as it is much softer it produces rugs considerably inferior in wearing qualities. There are two kinds of fleece rugs: (1) those made with wool taken direct from the fleece and merely washed and dried first; (2) those made from Herdwick wool which, in Ain addition to being washed, has been combed or carded. The second plan, though a little more expensive, has various advantages and is the one described to you here. For both types of wool the method used is exactly the same.
Tools and Materials Required. Hook and rug canvas as for Method 1 (see page 37); a combined wooden measure and gauge by which (a) the wool is cut into hooking lengths and (b) the height of the pile is regulated when clipping; a strong wire comb, such as a dog comb from the sixpenny stores; a sufficient quantity (averaging 1 lb. to the square foot) of carded Herdwick wool in the colours required. Regarding colours, the light and dark drab (used for the field and border respectively of the rug in Fig. 9) are much more plentiful and easy to buy than the off-white and dark brown shades. So it is advisable to choose a very simple design such as that in the photograph. Though so elementary, this is always effective and requires only the two commonest shades.
The wooden measure-gauge (Fig. 10) cannot be bought, so it must be home-made. Any piece of wood will serve, such as a wide ruler, which is 1-and-a-quarter inches in height or depth. But to save the labour of holding a thin thing like this upright against the pile while clipping, the measure should be thick enough to stand by itself or be made to do so by having a second piece fixed to it at right-angles. Most home handymen can evolve this simple gadget from oddments of wood. To serve as measure as well as gauge, the right-angle supporting piece should have marked on it (see Fig. 10) a distance of 4-and-a-half inches starting from one end. Fig. 10 shows the gadget in the background.
Herdwick fleece wool may be bought from the address given on page 152. When ordering, mention that you require it carded without oil for rug-making. Actually, for technical reasons it is impossible to card wool without using grease at all; but if the manufacturers know that it is wanted for rug-making they will prepare it with only a small amount of oleine added.
Washing the Wool. Your first job is to scour the oleine, which has served its purpose once carding is completed, out of the wool, which is sent to you wound in a giant ball known as a cheese. Make a bag of loosely woven cotton material, such as cheesecloth or unbleached calico, large enough to contain the cheese. The ball in its bag is then well boiled in the kitchen copper or elsewhere, in water to which some washing powder has been added. Rinse in warm water, mangle, then dry out of doors, when the wool will be free from grease and ready for use.
To cut the wool into hooking lengths, lay it on the marked gauge, with its ends reaching just to the mark ending the 4-and-a-half inch length, as shown in the background of Fig. 10. Cut off a length by keeping the scissors along the end of the marked piece of wood, as shown. Repeat till enough lengths are cut.
Making the Fleece Rug. Follow Method I (page 41), hooking into every row of the canvas but only into alternate ridges or squares in each row. This, of course, halves the work compared with Method I, but the fleece wool is so thick and wiry that it makes a luxuriously close pile. Along the outside edges of the canvas only, work into every hole to give an extra firm, thick edge.
Compared with Method I, these working differences must be noted. Use a cut piece of wool, dividing it to about the thickness of a pencil, and twist it tightly between the fingers just before hooking it in. After hooking four rows, comb the pile thoroughly with the wire comb to remove the loose wool. Then with scissors clip the pile to 1-and-a-quarter inches in height, using your wooden measure to ensure evenness. Comb again, only lightly this time, and continue hooking four more rows.
When clipping the first four rows, there is a special point about which you must be wary. As there is nothing to hold these first rows upright, they fall over the edge and in this position it is easy to cut them much too short. They should therefore be propped upright before they are clipped. Or all outside edges of the rug may be left unclipped until the rug is finished and only then trimmed to the same height us the rest of the pile. The wool combings and clippings should be kept, as they make an ideal filling, which costs nothing, for cushions or 'down' quilts. Thus, although you have always to buy a considerably greater weight of wool than the rug will eventually weigh, to allow for the combing, not a scrap of hr wool is actually wasted.
The completed rug may be lined or not, as preferred.
MARL AND HIT-OR-MISS EFFECTS
As already mentioned, the colour range in carded fleece rugs is very small and in its turn limits possible designs. But, as with certain of the rag rugs described in Chapters VII to IX, some attractive effects may be obtained, with or without a regular design, in marled and broken surfaces. To give a marled appearance, when hooking twist together half a tuft of dark and half of light wool; the result is pleasantly mottled. Or, if you have irregular quantities of several shades to be used, the rug, except for a border and corners or centre of one definite colour, may be hooked of all the shades used at random to produce a hit-or-miss broken surface which tones in well with many colour schemes. The rag rug design shown in Fig. 28, page 124, might be copied in this way in carded fleece.

You are visitor number: