HOME RUG MAKING
PREFACE
Few occupations can rival the attractions of rug making as a home pastime - or as a means of augmenting a slender income. As a hobby it has many advantages; it is interesting, it is easy, it is restful, and it does not require expensive tools. You must actually make a rug, and watch the pile creep over the canvas under your fingers, to realize to the full the especial joy of creative work; and, with some experience, there is no reason why your work should not equal the finest specimens produced by the artist craftsman of the East.
The most agreeable rugs are those with a deep lustrous wool pile into which the feet sink with a feeling of luxurious satisfaction, and a simple way of making this class of rug is described in Chapter II of this book; but you should first read Chapter I and learn something about canvas and the materials you will require.
Later chapters in this volume tell you how to make serviceable rugs from rags and waste materials, and how to weave a rug on a simple loom; while instructions are also given for making rugs of felt with applique designs, and on numerous ways of making rugs by needle weaving, knitting or crochet.
Finally you are shown how to prepare your own designs, and how to use or adapt existing patterns to meet any possible requirement.
CONTENTS
CHAPTER
I. Materials and Tools
II. Making Tufted Rugs
III. Short Pile Rugs
IV. Cross-stitch and Other Rugs
V. Crochet and Knitted Rugs
VI. Plaited and Other Rag Rugs
VII. Furniture and Applique Rugs
VIII.Simple Woven Rugs
IX. Rug Designs
CHAPTER ONE - MATERIALS AND TOOLS
Rug Making is one of those delightful crafts that costs little, requires very few tools - can be taken up or put aside at any time - and is a most agreeable home occupation that results in the possession of an article of beauty and enduring worth. There are various methods of making rugs - those mostly followed involve the knotting of short pieces of wool to a foundation of canvas or other material. The knotting is variously accomplished by means of very simple hooks or with inexpensive hand tools.
Reference to catalogues issued by various firms shows that there is an almost bewildering selection of wools, canvas and the like, but the novice should not be alarmed by this display, because it is possible to make very nice rugs indeed with ordinary rug canvas and rug wool that can be had at reasonable prices at any wool shop, at many popular stores, large shops or from specialist firms.
Specific examples of rug making described in later chapters of this book contain particulars of the materials and tools necessary for the examples given, but in this Chapter a number of alternative and additional materials are briefly dealt with and notes given concerning their choice and use so that readers will be able to make their own selection when devising rugs for any particular purpose.
CANVAS
Canvas is a coarse fabric, woven from yarn which is hard twisted. Various kinds are used in rug making - some with single threads forming the mesh, others with double threads and a few with single threads one way and double threads in a direction at right angles.
RUG CANVAS
This is the material used for tufted rugs, it is woven with double threads, Fig. 1, and is generally sold in a buff or brown colour, is made of cotton and available in various widths the usual widths are 12, 18, 27 and 36 inches, and is sold by the yard at prices averaging 8d., 1/-, 1/4, and 2/- per yard respectively.
The plain brown is generally a little cheaper, the best buff coloured is usually a little more in cost. Canvas can be had in widths of 12, 18, 27, 36 and 45 inch width, and should be bought and used in the correct width so that the selvedge will serve as the rug edge, and thereby avoid cutting and binding at the edges. When purchasing - always allow an extra 4 or 6 inches to allow for turning in the ends.
Rug canvas is woven in such a way that the separate threads form a network or mesh, the spaces between them - known as holes - bear a definite relationship to the width of the canvas, and, eight of the holes across the canvas and eight holes along the length of the Canvas are in "check" rug canvasses indicated by coloured strands, so that the entire surface of the canvas is marked out in large squares each containing 64 small holes. Strictly speaking "plain" rug canvas is what the name implies - and does not have these large squares marked on it - the usual designation for the squared canvas is "check" rug canvas - but as most of the material now in use is "check" or marked in squares - the reader can assume that any references to "rug" canvas - means the check or squared variety.
HOLES TO WIDTH
The average number of holes to various usual standard widths of rug canvas are as follows:
Width of Canvas: 12, 14, 18, 27, 36 inches.
Number of Holes to the Width: 40, 48, 56, 96, 124 holes.
It is important to realise this arrangement of holes, and their sub-division into checks or squares - each containing 8 by 8 - that is 64 holes in all - because rug designs are mostly worked out on this basis - unless specially noted to the contrary.
SMALLER MESH RUG CANVAS
This is generally similar but is manufactured specially for cross-stitch, locker-stitch and other rug making methods for which a smaller mesh is more suitable.
This canvas is also available in "plain" or "check" varieties, the usual stock widths and number of holes are as follows
Width of Canvas: 12, 14, 18, 27, 36 inches.
Number of Holes to the Width: 46, 52, 70, 104, 142.
Here again the " check" or large squares contain 8 by 8 holes - that is 64 in all - consequently these large squares are actually smaller than those on standard rug canvas, consequently designs for rug canvas - if worked to on small mesh canvas would come out smaller in actual dimensions - therefore the rug would have to be made up by increasing the area of the ground, or by adding to the width of the border - or by re-arranging the design.
Special designs are of course made for small mesh working, but it is important to realize the need for caution - the novice should avoid all trouble by using the specified materials for each of the examples given in this book.
SPECIAL CANVASES
There are many varieties and makes of foundation materials having qualities adapting them particularly for certain purposes - it is impossible to mention all of them within the compass of a small handbook, but a few examples are mentioned here so that readers may appreciate that the various manufacturers concerned offer a splendid range of every conceivable form of canvas and other foundation materials.
For example, there are special canvases for "short pile" rugs. The "Helvellyn" Jute canvas forms an excellent foundation for cross-stitch rugs. "Goblin" check canvas is an admirable material for rug making and when used with "Gnome" wools is suitable for making short pile or stitched rugs.
Another canvas - known generally as "Smyrna" canvas is used in conjunction with a strong steel crochet hook for the making of "Smyrna" rugs
HESSIAN
Hessian is a strong, coarse plain woven wrapping cloth usually made of jute or hemp yarns, used as a foundation for rag and other rugs, also for backing and lining. Available in various colours and black, and from 36 to 50 inches wide.
LININGS. This word is applied generally to a class of fabrics - such as Italian cloth - they are suitable for covering the back of a rug.
WEBBING. A woven material, made in various widths - sizes from 2 to 3 inches wide, are used for binding the edges of rugs.
ADHESIVE BACKING. A special material in black, 36 inches wide, and used for covering the backs of certain types of rugs, the adhesive on the material enables it to be fixed by means of a hot flat iron.
WOOL. Wool is the soft curly covering which forms the fleecy coat of the sheep and other similar animals, wool used for rug making are collectively known as rug wool - and has long strong and rather coarse fibres. There are many excellent makes of rug wool - specifically designated by the makers name - or by a well-advertised name.
The wool mostly used has a 6-ply yarn is available in innumerable colours and can be had in various grades and qualities. It is always advisable to buy the best quality, rug wool is usually sold in 4-ounce hanks.
QUANTITY OF WOOL REQUIRED
Ordinary good quality 6 ply wool used for making tufted or knotted pile rugs takes nearly three-quarter lb. to cover a square foot of surface. Exact quantities cannot be estimated owing to variations in tension and length of pile, but the quantities given are a fair average and will serve as a basis when ordering wool.
RUG SIZE
12 by 30 inches - 1 & three-quarter lbs. wool.
18 by 36 inches – 3 & one-quarter lbs. wool.
27 by 54 inches – 7 lbs. wool.
36 by 72 inches – 12 & one-quarter lbs. wool.
45 by 90 inches – 19 & one-quarter lbs. wool.
WOOL THRUMS. Short lengths of wool sold by the pound in assorted colours, varying from 6 to 36 inches or so in length–are very cheap but quite good for knotted rugs.
READY CUT WOOL. Wool supplied cut to length ready for use in making tufted or knotted rugs.
JUTE YARN. Used for needle weaving in rugs, in various colours, sold in 7-ounce hanks averaging 150 yards in length.
CHENILLE. A cord used for pile rugs, sold in short lengths, in hanks of assorted colours. Hanks range from half lb. to 3 lbs. in weight.
CABLE RUG WOOL. A special kind of extra thick wool - usually employed with special designs and worked into every alternate space in the canvas and not into each one - as is done in the ordinary way when using rug wool.
DESIGNS AND CHARTS
The various wool firms supply beautiful coloured charts for making all kinds of rugs - these include details of the best wools to use and the quantities of each. The use of such designs is strongly recommended.
STENCILLED RUG CANVAS
Canvas on which the design is stencilled in colours are extremely useful, especially for the beginner, all that then has to be done is to work the wool of the corresponding colour into the canvas. Similarly stencilled designs on Hessian and other materials are also available, the reader should apply to the local wool shop for full details.
NEEDLES AND HOOKS
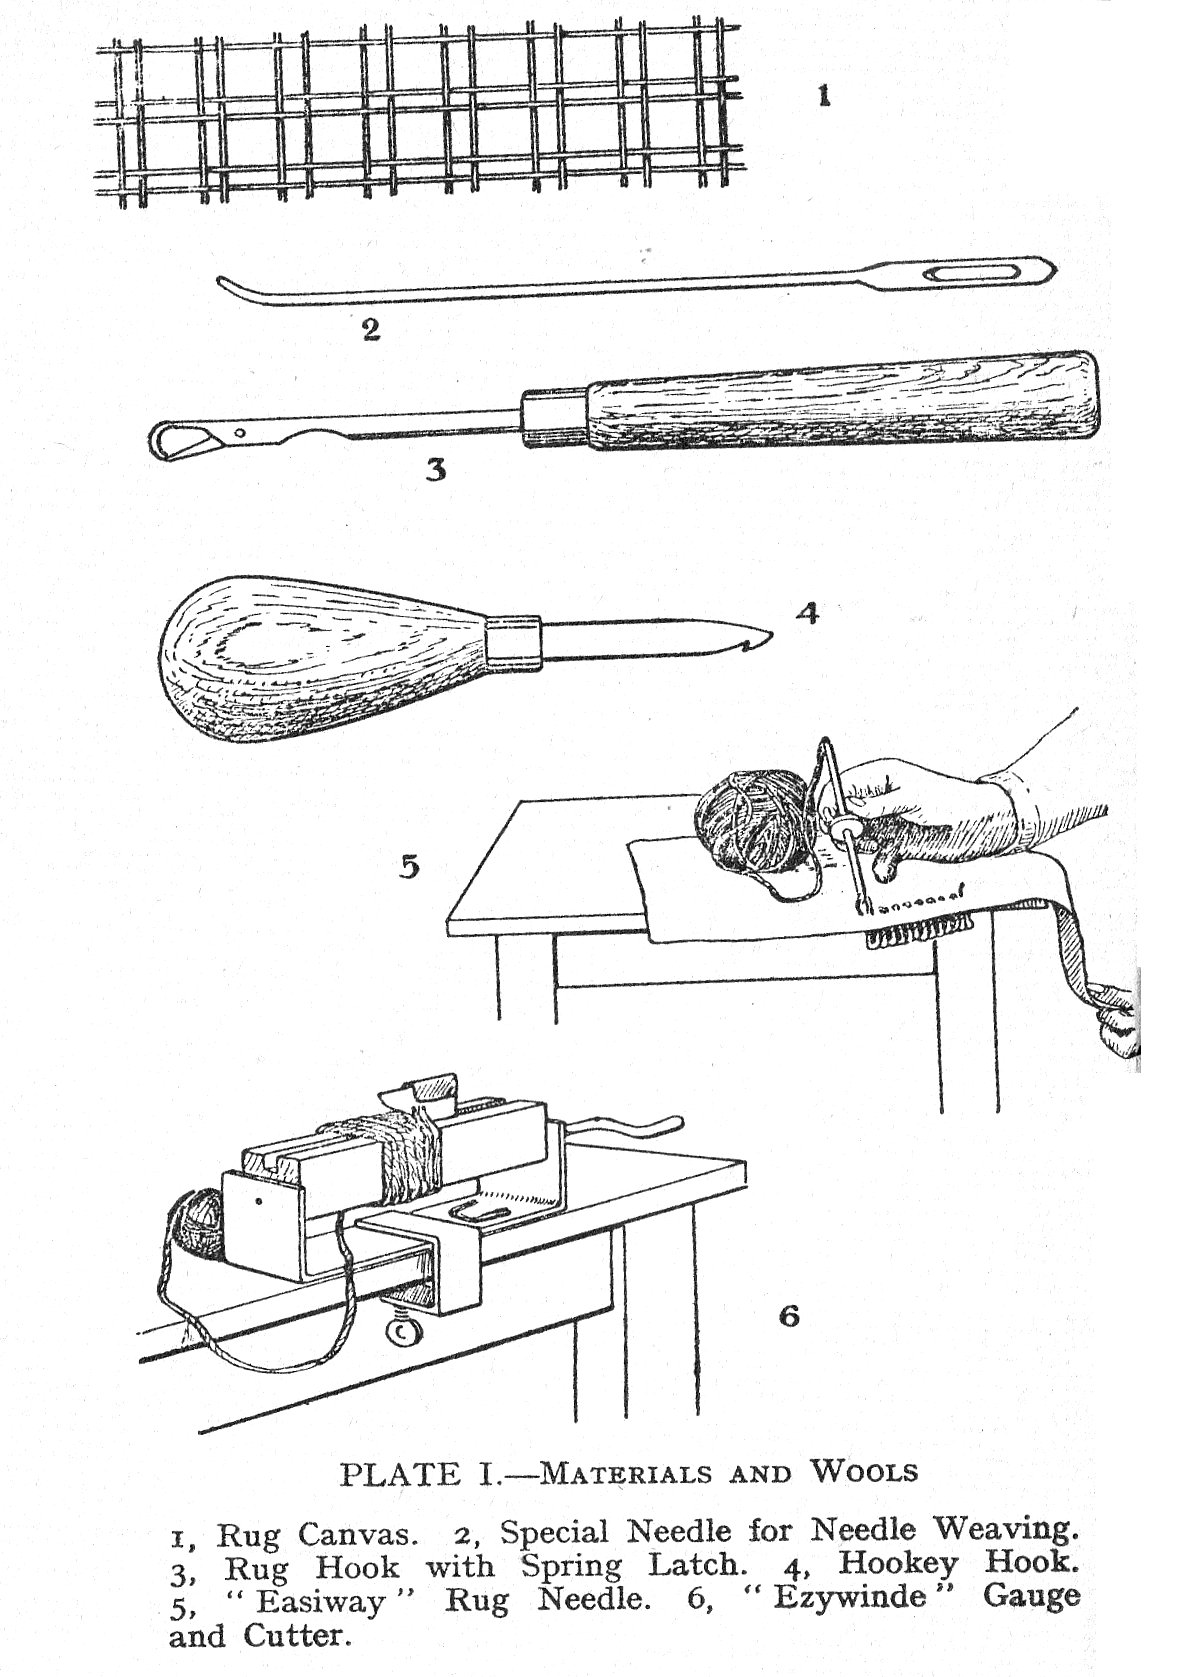
The purchase of suitable needles for the various kinds of rug making is simplified by the fact that most of the needles are designated by their purpose - you simply have to ask for a "cross stitch" needle for making a cross stitch rug and so on. Fig. 2 is a special needle for needle weaving; Fig. 3 is a rug hook with spring latch.
There are in addition a number of special needles and hooks which facilitate the work - for example - the "Hookey Hook," Fig. 4, the various forms of Latch hooks, with spring latches, and patent devices such as the "Easiway" rug needle, Fig. 5, and many others - several of which are dealt with in detail in succeeding chapters. The "Ezywinde" gauge and cutter for winding and cutting wool to length, Fig. 6, is a practical time saver.
MATERIALS FOR WOVEN RUGS
Wool for rug weaving is generally single ply and must not be confused with ordinary rug wool. Jute yarn used in rug weaving is sold in 7-ounce hanks; a special rough material known as Warp yarn can be used for the warp threads - a single thread of this material is sufficient - it need not be used double.
SOURCES OF SUPPLY
Supplies of material and tools of all kinds can be had from local wool shops, or by post from such firms as "Dryad Handcrafts, Ltd," Leicester; or J. J. Kendall, 96, Crosby Street, Maryport, England, both of whom specialize in supplying large or small quantities - or any material or appliance required for rug making.
CHAPTER TWO - MAKING TUFTED RUGS
A luxurious pile rug into which the feet sink with a feeling of gratitude after a tiring day's work need no longer be a coveted ideal, but can be realised by anyone who follows the instructions in this Chapter. The cost for materials is exceedingly small compared to the price of a rug of equivalent quality bought from a shop. Moreover, you have the satisfaction of selecting the exact shape, colours and design that pleases you the most, and knowing that your hand-made rug contains the best materials.
If your furnishings follow the modern trend - with simple restrained lines and an absence of elaborate ornament, your hand-made rug will impart just the right touch of colour and become a prominent but pleasing feature.
To make a really luxurious wool tufted, or pile rug measuring 27 inches wide and 54 inches long, you will require 1-and-three-quarter yards of 27 inch check rug canvas, and about 7 pounds of Turkey rug wool, a Turkey rug wool gauge, and a latch hook, as in Fig. 3, Chapter 1.
If you intend to make a perfectly plain rug you need only buy plain rug canvas - but if you want one with a pleasing design you can either work according to a plan or tabulation stating the colours in each row - or what is far easier you can buy a piece of rug canvas with the design stencilled on it in colours so that as you work - you merely use wools of the correct colour and take them in as required. The cost of a stencilled rug canvas is higher than a plain canvas - but the saving of time and trouble is well worth the extra outlay.
One other point to bear in mind is that if your design is very simple, say a plain centre with a different colour for the border, you can easily mark the width of the border on a plain canvas.
QUANTITY OF WOOL REQUIRED
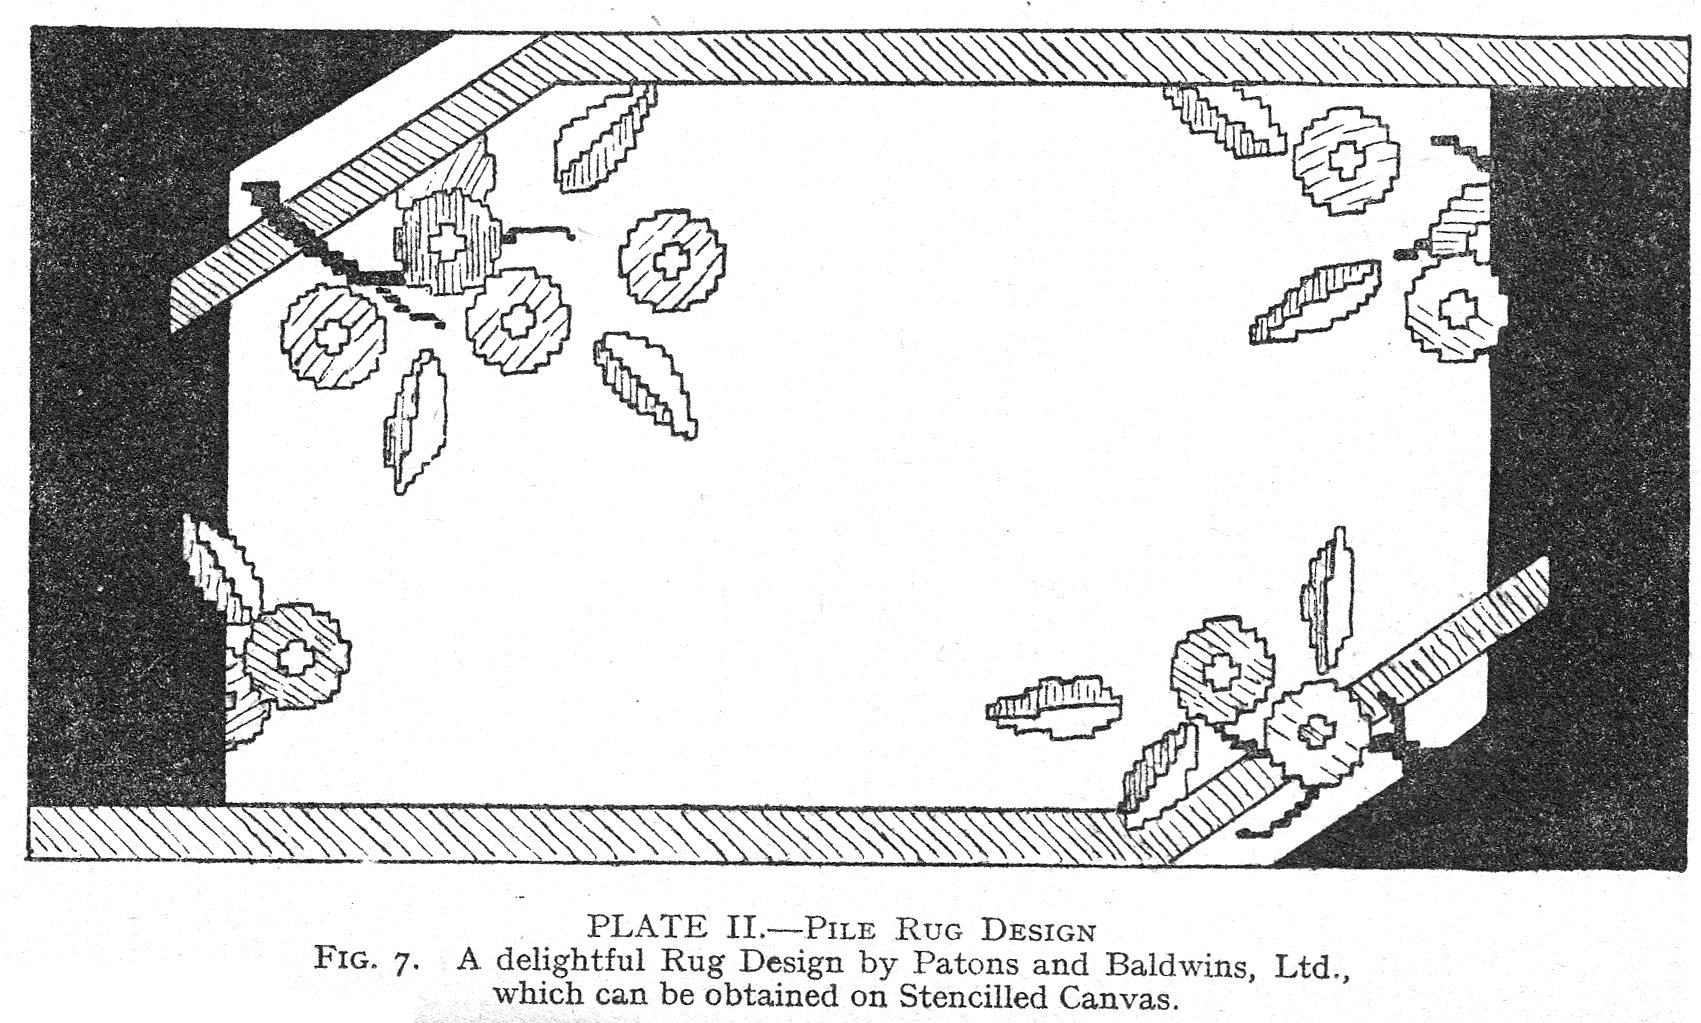
When you intend to use a design in several different colours it is best to buy a design and stencilled canvas and to obtain the quantities and make of wool specified, for example, a very pleasing rug design, No. 207, by Patons and Baldwins, Ltd., Fig. 7, requires quarter lb., No. 54 Orange, quarter lb. No. 72-and-half light Biscuit, 1 lb. No. 74 Fawn, 1 lb. No. 85 Drab, 1and-a-half lbs. No. 102 Dark Brown and 3-and-a-quarter lbs. No. 121 Stone colour. All of these colours are in Turkey rug wool and by way of example it will be assumed that a rug of this type is now to be made.
Having bought all the Turkey wool, wool gauge, rug canvas and the design of Patons and Baldwins - check over the quantities and colours to see that you have enough of each. Do not buy less than is required to finish the rug, because it may be difficult to match the exact shade at some later time.
HOW THE RUG IS MADE
An ordinary pile rug is made by hooking short pieces of wool through the canvas and knotting them to form little tufts so closely worked together that they form a pile like a carpet.
The first thing to do is to prepare the lengths of wool, which you do with a gauge. This must be suitable for the wool and the pile - consequently use a Turkey wool gauge - when using Turkey wool. Later on - when you have gained some experience you can adapt various methods and devices - but for a start use the specified wools and gauge.

Commence by winding the various wools into balls as usual, then holding the gauge in the left hand, wind the wool around it, Fig. 8, so that it is covered from end to end, but take care to keep a regular tension on the wool - do not make it tight in one place and slack in another - also keep the spacing regular and see that none of the turns overlap.
If you look at the gauge you will see that it has a groove in one edge and this is provided so that you can cut the wool by means of a long thin pair of scissors, one blade of which slides along in the groove in the gauge, Fig. 9, or you could cut from the top with a sharp razor blade fixed in a wooden handle or use a patent wool cutter. As you cut the wool it falls off the gauge and it is convenient to have a clean cardboard box handy into which you can drop the cut pieces - which you will observe are all the same length.
Actually the depth of the pile on your rug is determined by the width of the gauge - because this settles the length of the pieces of wool, for average purposes a gauge 1 inch wide is suitable.
Having prepared a stock of cut pieces sufficient for your immediate needs - you can begin making the rug. Lay the canvas across your knees - or put it on a table with one end projecting towards you - turn up about 2 inches of canvas at one end so that it comes up on to the face or "right" side of the canvas and work the border through the double canvas, which results in a neat and strong finish. If using a chart or design, turn the canvas up at a blue line, because this corresponds to a thick line on a chart.
USING THE HOOK
Knotting the wool to the canvas is facilitated by the use of a latch hook and assuming you are using one of the ordinary patterns, proceed to make the knot in the following manner.
First you push the hook through a mesh in the canvas so that the latch is carried past a double strand, then onwards through a hole in the next row and leave the latch standing up; then you take a cut piece of wool in the left hand, double the wool in the middle of its length, put the loop thus formed over the hook, Fig. 10, and draw the wool tight.
The next thing you do is to pull the hook towards you while holding the cut ends of the wool with the left hand; draw the wool through the two holes for about half the length of the strand, Fig. 11, and meanwhile watch the action of the latch - which you will see has automatically closed and covered the point of the hook so that it becomes a very easy matter to pull the wool through the canvas.
Now push the hook through the loop of wool - again taking care that the hook is so far through that the wool is behind the latch.
Turn the point of the hook towards the right and place the two loose ends of wool into the crook of the hook, Fig. 12, and with a firm steady pull draw the ends of wool through the loop, Fig. 13. The hook will draw clear of the work, and you will then see that the knot has been completed and all you have to do is to give the ends a pull, Fig. 14, to tighten the knot.
Making the first few knots will seem a very slow job, but after a short time you will be able to work very quickly and you will be surprised at the ease and speed with which you can make a large section of your rug in a few hours.
DIRECTION OF WORKING
The easiest way of working is to sit at a table, place the canvas on it with the end facing you. Work from left to right and always in the same direction so that the pile will lay at the same angle.
Complete a row at a time working steadily row by row from left to right and using different colour wools as required by the pattern. Place a sufficient weight on the canvas so that it will resist the pull when you make the knots.
Do not forget the twist to the right when making the knot, because this tends to a firm compact pile.
FINISHING THE RUG
As the only mechanical action you have to learn is knotting the wool with the hook - you will soon acquire the knack and be able to make firm, regular and uniform knots and the two loose ends will stand up and gradually form the pile. When you reach the opposite end of the rug turn the canvas over as at the start and knot the wool through the double thickness, which results in a firm selvedge and a neat appearance at the back.
On examining the back you will note that the wool is knotted to the crossway strands and only the lengthways strands of the canvas are visible.
Working in this way brings the finished part of the rug towards you and then you will find that a lot of fluff comes from the wool. To prevent this adhering to your clothes cover your knees with a sheet or cloth. The loose fluff comes from the cut ends of the wool and is quite unavoidable and is not detrimental, in fact, when you have finished the knotting you must thoroughly shake the rug and rub it all over with the hands, but always in the same direction. This removes most of the fluff and loose ends of the wool fibres and gives to the rug a lustrous compact appearance.
If the two ends of each tuft have been kept level during the knotting the surface of the pile will be fairly level, but any irregularities or long strands should be clipped off with a sharp pair of scissors to produce an even and flat surface.
There is no need to cover the back unless you wish, but the edges should be bound with a strip of webbing sewn firmly all round the rug. Lead weights can be sewn into the webbing to keep the rug flat - while a special "non-slip" binding can be used to help keep the rug in place on a polished floor.
You can make rugs of any shape or size by this method, but when any of the edges are curved, it will be necessary to cut off the surplus canvas fairly closely to the knots - say about 2 inches away - then turn in the canvas and secure it with a binding sewn on the outer edge first - then folded and pressed to make it lay flat and finally secured by sewing the inner edge.
Similar results can be obtained by the use of a patent rug maker in the form of spring nippers, in appearance something like a pair of pliers with a wooden handle.
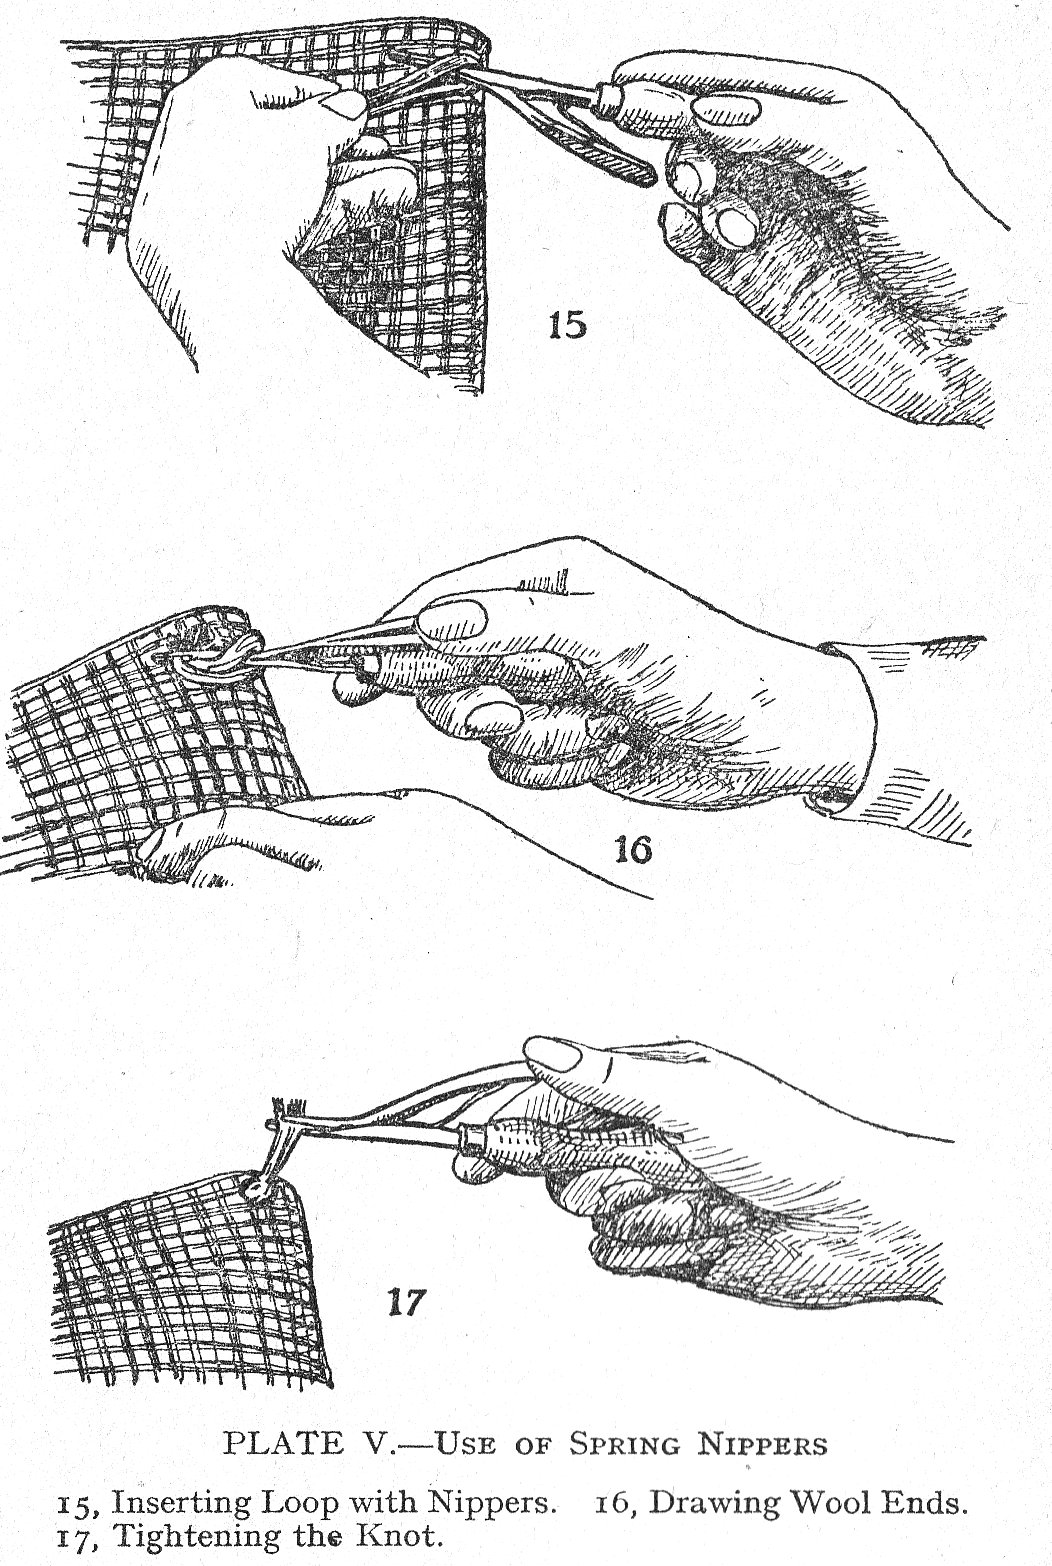
The method of using these nippers is very simple - first you pick up and loop a strand of wool, pass the end of the nippers through the loop and then you push the nippers through one hole and into the next hole, Fig. 15, in the rug canvas.
This brings the loop of wool behind the nippers and on the top of the canvas, and at this stage you open the jaws of the nipper by pressing the trigger handle lightly with the thumb; then take hold of the cut ends of the strand with the jaws of the nippers, Fig. 16, relax the pressure on the trigger - thus allowing the jaws to close and grip the wool and then you draw the nippers backwards - which pulls the wool ends through the loop, and you complete the knot, Fig. 17, by tugging the wool ends. With a little practice this tool produces very good work and enables you to make tufted rugs very quickly.
From the foregoing you should realise that it is really simple and easy to make thick, rich and lustrous rugs with a deep pile, but there are other methods of making rugs - some of which are dealt with in the following Chapters.
CHAPTER THREE - SHORT PILE RUGS
Short pile rugs are generally more economical of material, and take rather less time to make than the ordinary tufted or long pile rugs described in the previous Chapter. Any design can be worked in short pile - or in full pile - the essential differences are the methods of making the knots and forming the tufts. In this case you use a rug canvas backing, but instead of a hook you use a coarse wool-needle and manipulate it more or less with a sewing action.
The canvas on to which the wool is worked ought to be rather coarser and thicker in the strands than that used for tufted rugs - the wool can be the same - or any good grade 6-ply rug wool. Approximately only two-thirds the quantity of wool will be required for short pile or needle woven rugs to those made on the knotted and tufted system described in Chapter Two.
The needles can be bought for a penny at any wool shop or store, and are like an ordinary needle but thicker and have rather a blunt point. You will also need a narrow "gauge" - in the form of a slip of wood about 6 inches long and quarter inch wide.
MAKING A SHORT PILE RUG
Select your design and canvas - then obtain the requisite wool but do not cut it, simply wind it into a ball - or on to a spool. Next you place your canvas on the table and hold it in position with a weight so that the row you are going to work lies exactly on the edge. You then work from left to right on the horizontal double thread of the canvas commencing about 2 inches from the end - or of course on the printed lines of the design on a stencilled canvas.
Thread a needle with any convenient length of wool, then insert it in the lower thread of the first mesh and draw the wool through until the free end is the same length as the width of the gauge.
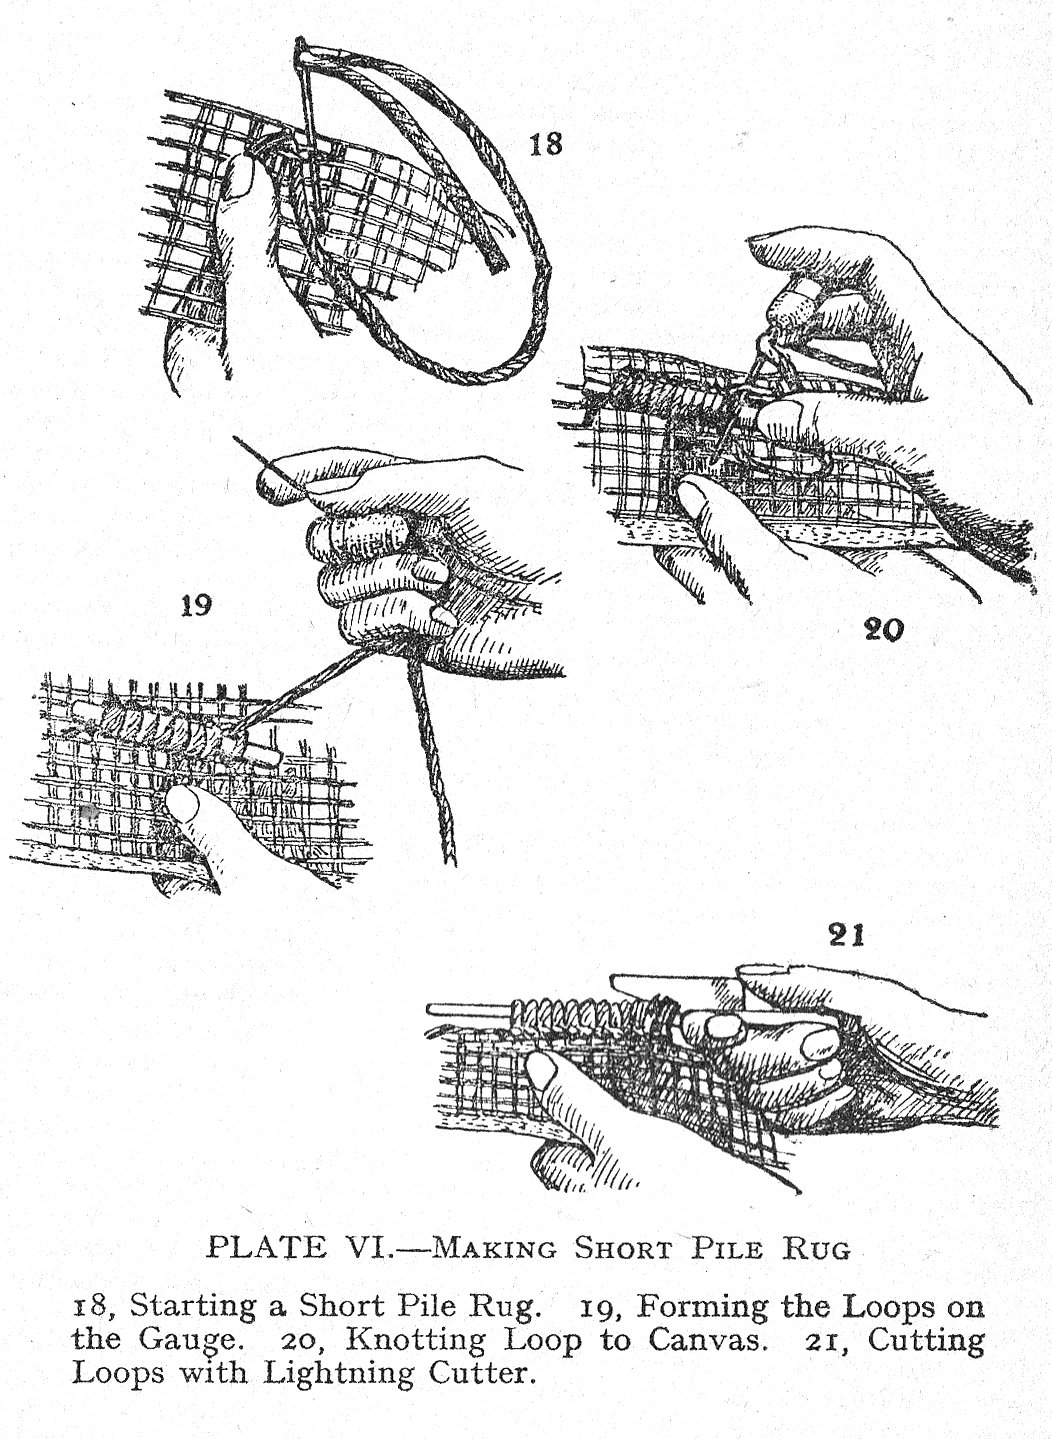
Next you put your thumb on the free end of the wool to hold it in place, then you insert the needle under the upper thread, Fig. 18, so that the wool lies to the right of the needle, then you draw the wool through.
GAUGING THE PILE
The depth of the pile is fixed by means of a gauge - which can be any reasonable width you please, but the regulation gauge costs so little that it is best to make use of it - and as it is smooth and has an oval section it is very convenient to use.
Place the gauge on the canvas, pass the wool under and over the gauge, then insert the needle in the lower thread of the next mesh so that the wool lies to the left of the needle. Draw the needle through and insert it into the upper thread of the same mesh, Fig. 19, so that the wool then lies to the right of the needle and then draw it through.
COMPLETING THE STITCH
You now complete the stitches by drawing them tight - which makes a secure knot, Fig. 20. Later on - when the loop is cut; the parts at present around the gauge will form a tuft which represents one square on a design.
All the stitches are made and knotted in the same way, and when the gauge is full you slide it along nearly to the end of the row and continue as before. You will quickly acquire dexterity and be able to work them rapidly and regularly - at the same time you will find out that a good deal less wool is required to complete a row than was needed by the method described in Chapter Two. Continue in the same way working from left to right along the horizontal rows.
CHANGE OF COLOUR
When the thread of wool is finished - or it is necessary to change the colour to suit the requirements of the design - cut the end of the wool in use so that it is the same length as the width of the gauge - then thread a needle with a new piece of wool of the required colour and begin as above described.
As the work proceeds, you must move the gauge along, and you can then cut the completed loops quite evenly with sharp scissors, or with a rug cutter such as the "Lightning," Fig. 21, which will cut a whole row of loops in a moment. It consists of a sharp cutting knife mounted on a long rod and all you do is to insert the point end in the row of loops and push the cutter forwards.
When you have finished the wool work, rub the pile surface thoroughly with your hands to work out the loose fluff, and if necessary clip lightly with sharp scissors to obtain an even surface. Then turn back the ends of the canvas and sew them in place - and finish off by sewing a strip of 3 inch wide webbing to the back - to cover and neaten the ends.
There is no need to fix a backing on these rugs unless they are for use on a very rough floor where they will be subject to extra hand wear - in which case a Hessian or glazed lining can be used and sewn neatly in place.
RUG MAKING WITH "LIGHTNING" NEEDLE
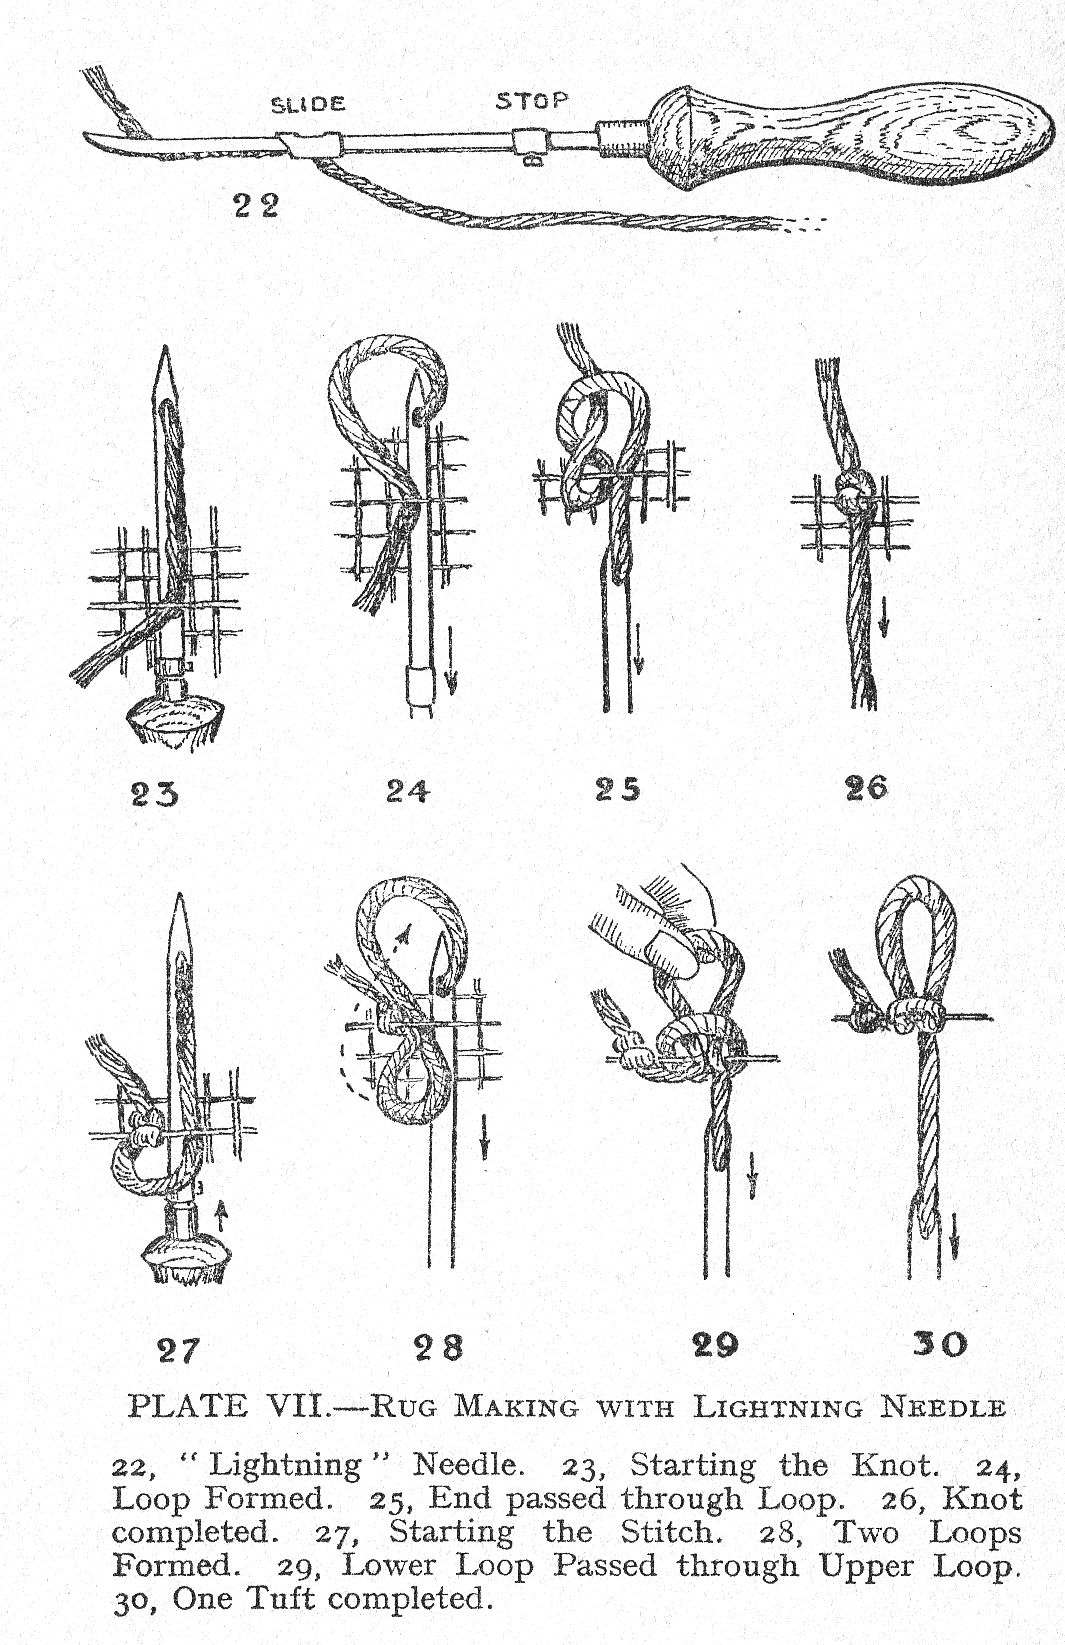
This patent rug needle, Fig. 22, knots as it knits - is easy to use - has an automatic feed, means for adjusting the length of pile, eliminates loose ends of wool and can be used on any rug canvas. Full instructions for use are supplied with it - but an outstanding feature is that you do not use separate lengths of wool, because you can keep on working until a ball of wool is exhausted - or it is necessary to change the colour.
You thread the needle by pushing the wool through an oval hole in a little sliding piece - while the latter is in the locking position - then you pull about 6 inches of wool through a hole in the needle and push the slide down the needle to the stop position, then you pull the wool out of the hole in the needle and put it through the eye of the needle, it is quite simple and is done in a moment.
USING THE LIGHTNING NEEDLE
First you push the needle under the thread of canvas until the slide touches the gauge stop, Fig. 23, then you partly draw back the needle which forms a loop, Fig. 24, through which you pass the end of the wool, Fig. 25, then hold this end and pull the needle out of canvas as far as it will go - which draws the knot tight, Fig. 26, and leaves the correct amount of wool for your next stitch.
You make the stitch by pushing the needle through the next hole in the canvas which leaves a loop, Fig. 27, then you partly withdraw the needle - which forms two loops, Fig. 28, one each side of the canvas thread. You then put the first loop through the second loop, Fig. 29, and withdraw the needle - which leaves a complete loop of wool, Fig. 30, securely knotted to the canvas.
Continue stitching in this way to the end of the row, then, without cutting the wool continue in a hole in the next row and work in the opposite direction, making your rug by working backwards and forwards across the canvas.
You finish off the last stitch by making the stitch as usual, but before you draw the knot tight - cut the wool from the needle and put the end through the loop, thus locking it.
CHANGING THE COLOUR
When changing colour - thread a new hall of wool and start the stitch as before, but also put the end of the previous wool - with the end of the new wool through the loop - thus knotting them together and to the canvas - then continue stitching as before. Finish the rug by cutting the loops and binding the back with webbing.
MAKING PILE RUGS ON HESSIAN
Very fine pile rugs can be made on a Hessian foundation using six-ply rug wool and a patent tool. There are several such tools varying in detail and method of manipulation - all of them having claims on your consideration, but by way of example, the method of making a wool rug with the "New Era" rug maker, Fig. 31, will now be described.
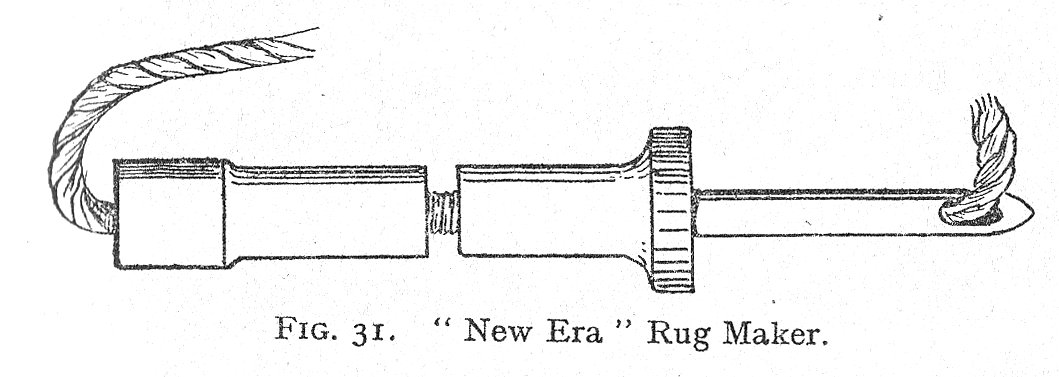
The needle itself is hollow and has an adjustable handle - you thread the needle by placing the end of the wool into the loop of the threader, then draw it up the tube and then through the eye of the needle, leaving a short end of wool with which to begin.
Adjust the needle for the length of pile you require - which you do by slackening a knurled nut and screwing up the handle. For ordinary use a length of needle of 2 inches measured from the handle to the centre of the eye will be about right. Be sure to fasten the handle securely so that it cannot work loose. By varying the distance between the handle and the eye of the needle you can have a longer or shorter pile just as you may require.
You can work with or without a frame (see Chapter Six for Frame), but you will require either a Hessian with a design printed on it - or you can use crayons and mark out your own design.
You work from the patterned side and form the loops on the underside, which ultimately becomes the pile side.
MAKING THE STITCH
Commence the work by pressing the needle into the Hessian as far as it will go - taking care to push it right up to the stop on the handle, then withdraw the tool but do not lift it - simply slide the needle point along without lifting it - then push the needle in again - and repeat until the colour has to be changed. Be careful to work always with the eye of the needle facing to the left so as to allow the wool to run loosely through it without being trapped.
Hold the Hessian firmly with your left hand and keep it as smooth as possible and free from creases. The tool forms its own length of loop and if you work it properly all the loops will be exactly the same height.
All the beginning and finishing ends of the wool must come on the pile side where they can afterwards be trimmed down when the loops are cut.
FINISHING THE RUG
When you have completed the wool work - cut all the loops as before - trim off any uneven ends - to make the pile perfectly smooth and even,- then turn in the edges of the Hessian, sew them in place and line the rug with linen, Hessian - or a good quality adhesive backing, which you fix very simply by "ironing on" with a warm flat iron. The backing has a kind of gum on one face - which you apply to the back of your rug - and the heat of the iron melts the gum and causes it to adhere very firmly.
CHAPTER FOUR - CROSS-STITCH AND OTHER RUGS
Very beautiful rugs with a flat surface can be made most successfully in "cross-stitch" on ordinary rug canvas, or preferably on the small mesh canvas.
The wools to use are any of the well-known makes of 6-ply rug wool if you intend working on rug canvas, but for working on "Goblin" canvas you should use a finer wool such as the delightful Gnome wool - a long-fibred lustrous material in 4-ply - which does not rub in pulling the needle and thread through the canvas.
The Goblin check canvas is advocated for cross-stitch rugs - it is rather finer in mesh than Turkey or ordinary rug canvas.
You can use any design intended for working in rug wool on rug canvas, but as the Goblin canvas mesh is finer - that is the squares on the Goblin canvas are smaller than on rug canvas - you must realize that the overall size of the finished rug will be smaller than the sizes given on a chart or design intended for working on, rug canvas.
When ordering wool allow about two-thirds the quantity specified for a design intended for working on rug canvas.
Supposing you have a design that you like, but it is detailed for working on rug canvas - and you intend instead to work it in Goblin canvas – and that say 6 lbs. of wool is specified for it - then you will only need two-thirds of it - that is 4 lbs. when you are working on Goblin canvas.
You can determine the size of your rug by counting the number of large "squares" across the design, and then measuring the width of a piece of "Goblin" canvas with the same number of large squares.
Designs and charts for working on Goblin canvas are of course followed exactly, as the quantities and sizes have been worked out specially for it, and you will not have to make any deductions at all.
MAKING A CROSS-STITCH RUG
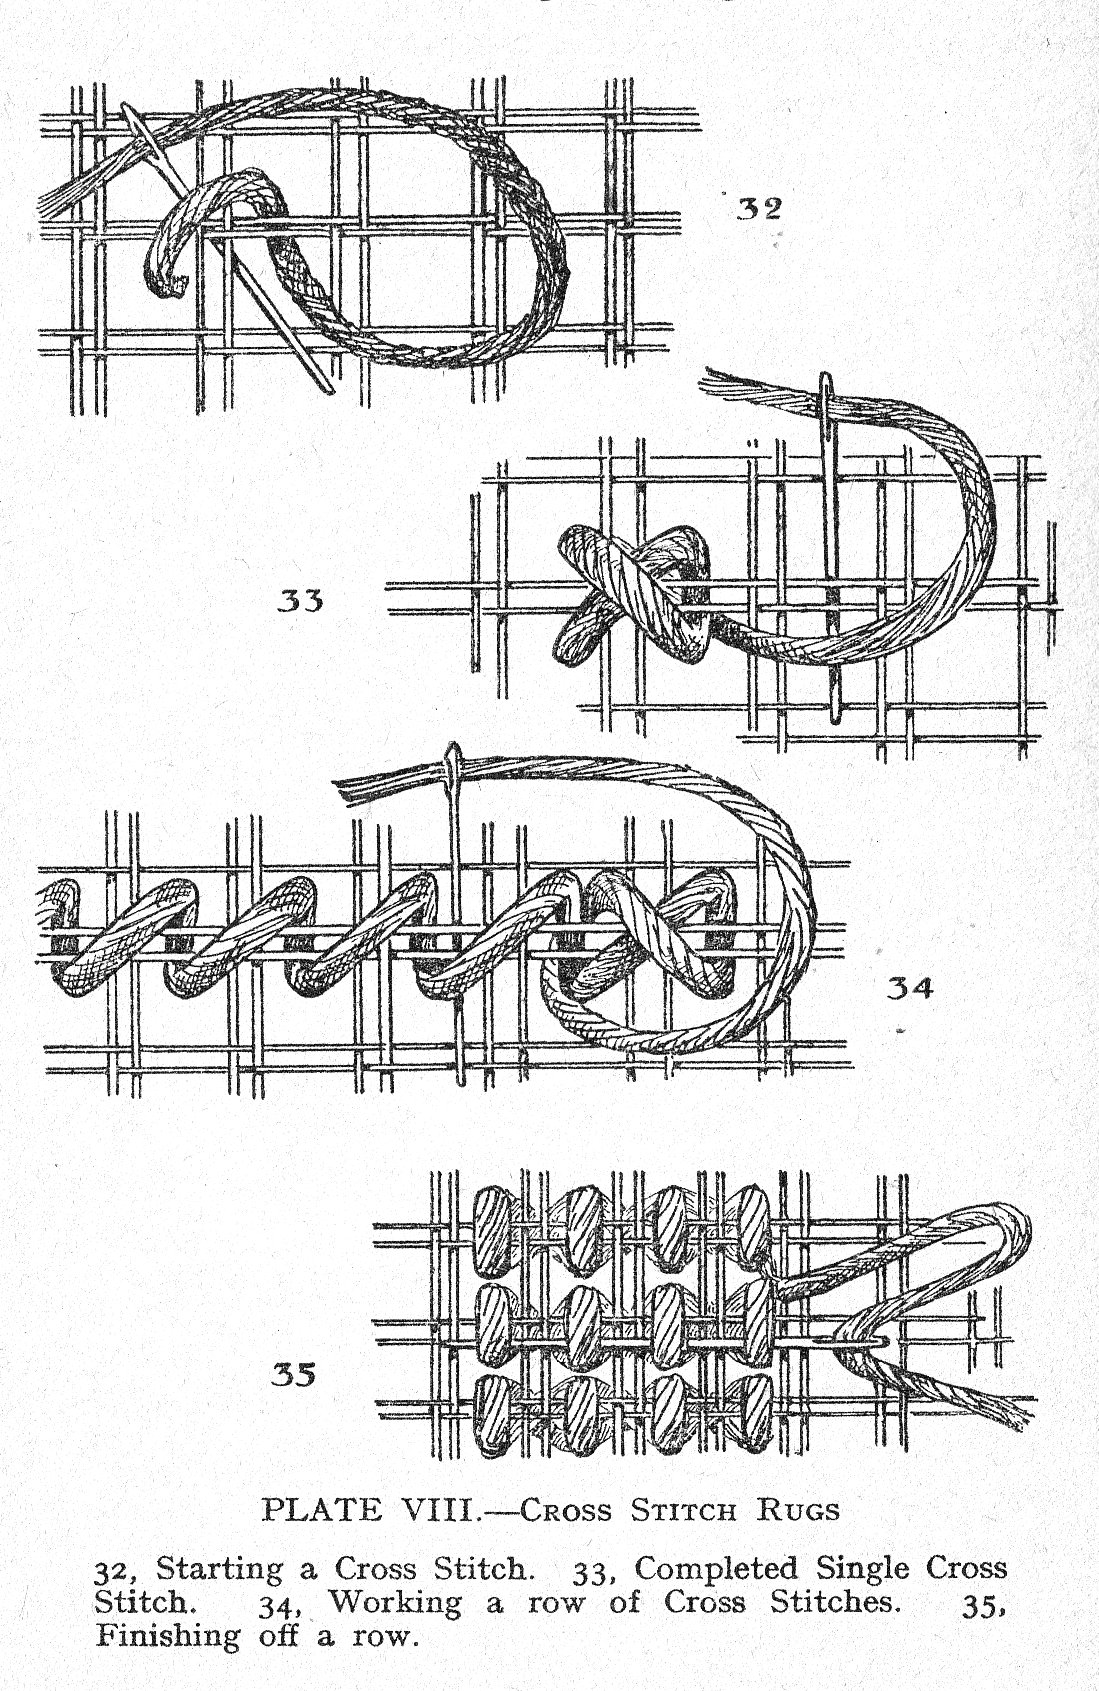
The method is to use a canvas backing and work the design in wool - using a needle - and making a uniform kind of stitch. There are no loops to form, knot or cut, and the surface of the rug is flat - more like a Brussels carpet in appearance - but very much softer.
There are several varieties of cross-stitch and a number of others that you can use - -some are referred to in Chapter Seven - but the usual method is as follows:
First you arrange the canvas on a table or across your knees as usual - or it can be worked in a frame. Next, you thread a coarse needle with a suitable length of wool, then you pass the needle up from the underside, through one hole and draw through another until about 2 inches of wool is left at the back.
Next you pass the needle down through the hole in the row above - and one to the right, Fig. 32, which will make a slanting stitch inclined towards the right. You then bend the canvas a little and bring the needle up and out through the hole next below which makes a straight stitch at the back and brings the needle into position for the second stitch - which is completed by taking the needle and the wool over the first slanting stitch and then in and down through the hole above the one first used. This completes one cross-stitch, Fig. 33, and you continue in the same way by taking the needle - under the canvas from the upper hole - into which you have just put it - and bring it up and out at hole No. 3 in the lower row and continue thence as before.
Generally however you will need a row or more of stitches, and it is easier and quicker to work a series of slanting stitches along the row and then reverse the procedure and work back again, Fig. 34, crossing over each stitch in the first row to make the full "cross-stitch."
HALF CROSS-STITCH
This stitch is simply the first half of the full cross- stitch, and really makes a row of slanting stitches on the right or face side and a row of vertical stitches on the reverse side.
Some good effects can be obtained by varying the stitch - for example - you can work out the pattern in whole cross-stitch and work the plain background in half cross-stitch - or in some of the better known embroidery stitches dealt with in Chapter Seven, or the Hungarian or the Kelim stitch.
WORKING RECTANGULAR RUGS
When working in cross-stitch on a rectangular rug, or on any straight part of a rug, you will find it most convenient to reckon up the number of squares you will need and then turn the remaining canvas in and work your stitches through the double canvas.
Should the canvas show at the turned in edge - you can whip it with wool, making one stitch in each hole and working around the rug to the start-point and then work back again, making another set of stitches over and across those made previously.
WORKING A SHAPED RUG
Shaped rugs worked in cross-stitch - or practically speaking - in any needle stitch - are best done by working the pattern first, then you turn the canvas edges over - on to the reverse side - and cut off any excessive amount leaving about one to two inches doubled. Fasten these with odd stitches here and there to keep the canvas in position - then work the border through the doubled canvas and fill in the remaining background.
BEGINNING AND ENDING THE ROWS
When starting leave an end of wool and gather it in under the stitches as the work proceeds, and when finishing a length of wool pass the needle under three or four stitches at the back, Fig. 35, When changing colour the end of the wool last used can be gathered under the stitches of the new colour - of course keeping the finishing end of wool at the back.
FINISHING OFF
You must be careful with all needle stitches to keep the tension on the slack side, otherwise you may pull the canvas out of shape. In any case - as the work proceeds it is a good plan to press the work from time to time - on the wrong side; use a fairly hot iron, but put a damp cloth between it and the work.
When all the stitching is finished, you should lay the rug out flat, rub it over with your hands and pull it into shape. Then press the underside with a hot iron used over a damp cloth.
If you finish your work neatly on the reverse side there will be no need to line or bind the rug, but many workers prefer to sew a band of webbing at each end - or around all the edges. If your rug is to be used on a rough floor - a lining of Hessian or suitable material should be sewn to the back of the rug before you sew on the webbing.
MIXED PILE RUGS
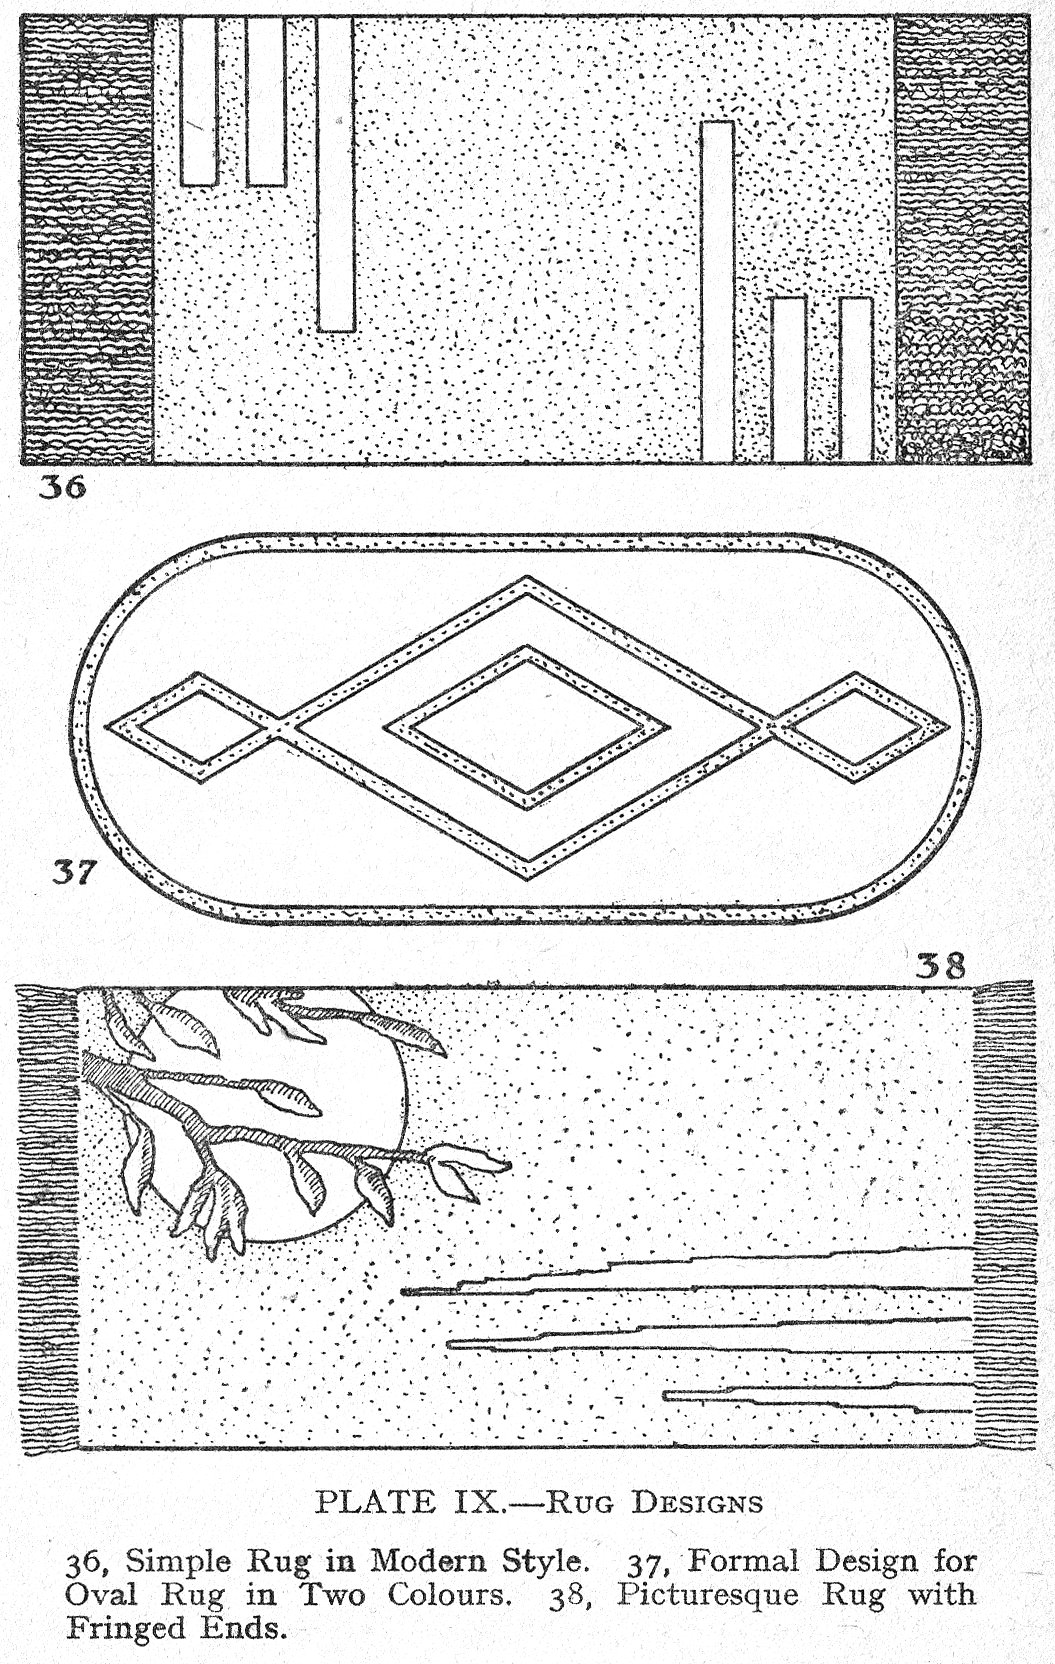
Although the average rug is made with a pile of uniform length, there is no reason why rugs with pile of different length should not be used - or you can make a rug with, say, a cross-stitch background and a tufted pile pattern. Some delightfully refreshing rugs are possible by this method, and it has the advantage that if you choose a suitable design, such as those in Figs. 36, 37, 38, you can use up all manner of odds and ends of wool. Rugs with pile of different lengths are made in the ordinary way - but you use cutting gauges of different width. You must be careful, however, to sort out your cut lengths and take care to keep them separate.
When making a rug with a mixed pile - having a needle-stitch background - work the stitches first - then press with a hot iron over a damp cloth and afterwards work the tufted pile pattern by the methods described in Chapters Two and Three. You will then possess a distinctive rug full of charm and character.
CHAPTER FIVE - CROCHET AND KNITTED RUGS
Present day tendencies in furnishing favours rugs of simple form, devoid of elaborate patterning, but remarkably fascinating when viewed against the severe background of modern furniture. Such designs are very "kind" to the method of making what is virtually a reversible rug - composed entirely of wool and not calling for a backing of any kind - nor any other tool for making it than that of a fat crochet hook.
Children can easily make a crochet rug - and if a design be chosen that is composed of strips or rectangles - several different workers can engage on the same rug and their resultant work be subsequently sewn together.
MAKING RUGS IN SECTIONS
The facility that crochet affords for the making of rugs in strips and sections enables a city worker to crochet a section at a time while making that tiresome daily train or bus journey. All that you need is some wool - your crochet hook and a bag to stow away the work. When all the sections of your rug are finished you simply press each section lightly with a hot iron under a damp cloth, then you lay them out in order on a flat surface and make the joins on one side by stitching them firmly together with waxed thread - which if done neatly will be practically invisible. After that, you again press the rug, which you will find will wear for years.
You are not obliged to make a crochet rug in sections - you can work continuously - either on rectangular or circular rugs; in the latter case you simply keep on working crochet round and round the edge, the rug meanwhile growing larger in diameter.
MATERIALS FOR CROCHET RUGS
Wools such as Paton’s and Baldwin’s "Gnome" wool used with a bone crochet hook, size No. 2, or Turkey rug wool used with an Inox No. 3 crochet hook are very suitable.
To give you an idea of the quantity of wool required you can reckon that 33 hanks of "Gnome" wool will make a circular rug about 36 inches diameter, that is 36 inches across.
If you want the average size rectangular rug, say about 30 inches wide and 60 inches long, then you will require from 5-and-a-half to 6 lbs. of Turkey rug wool.
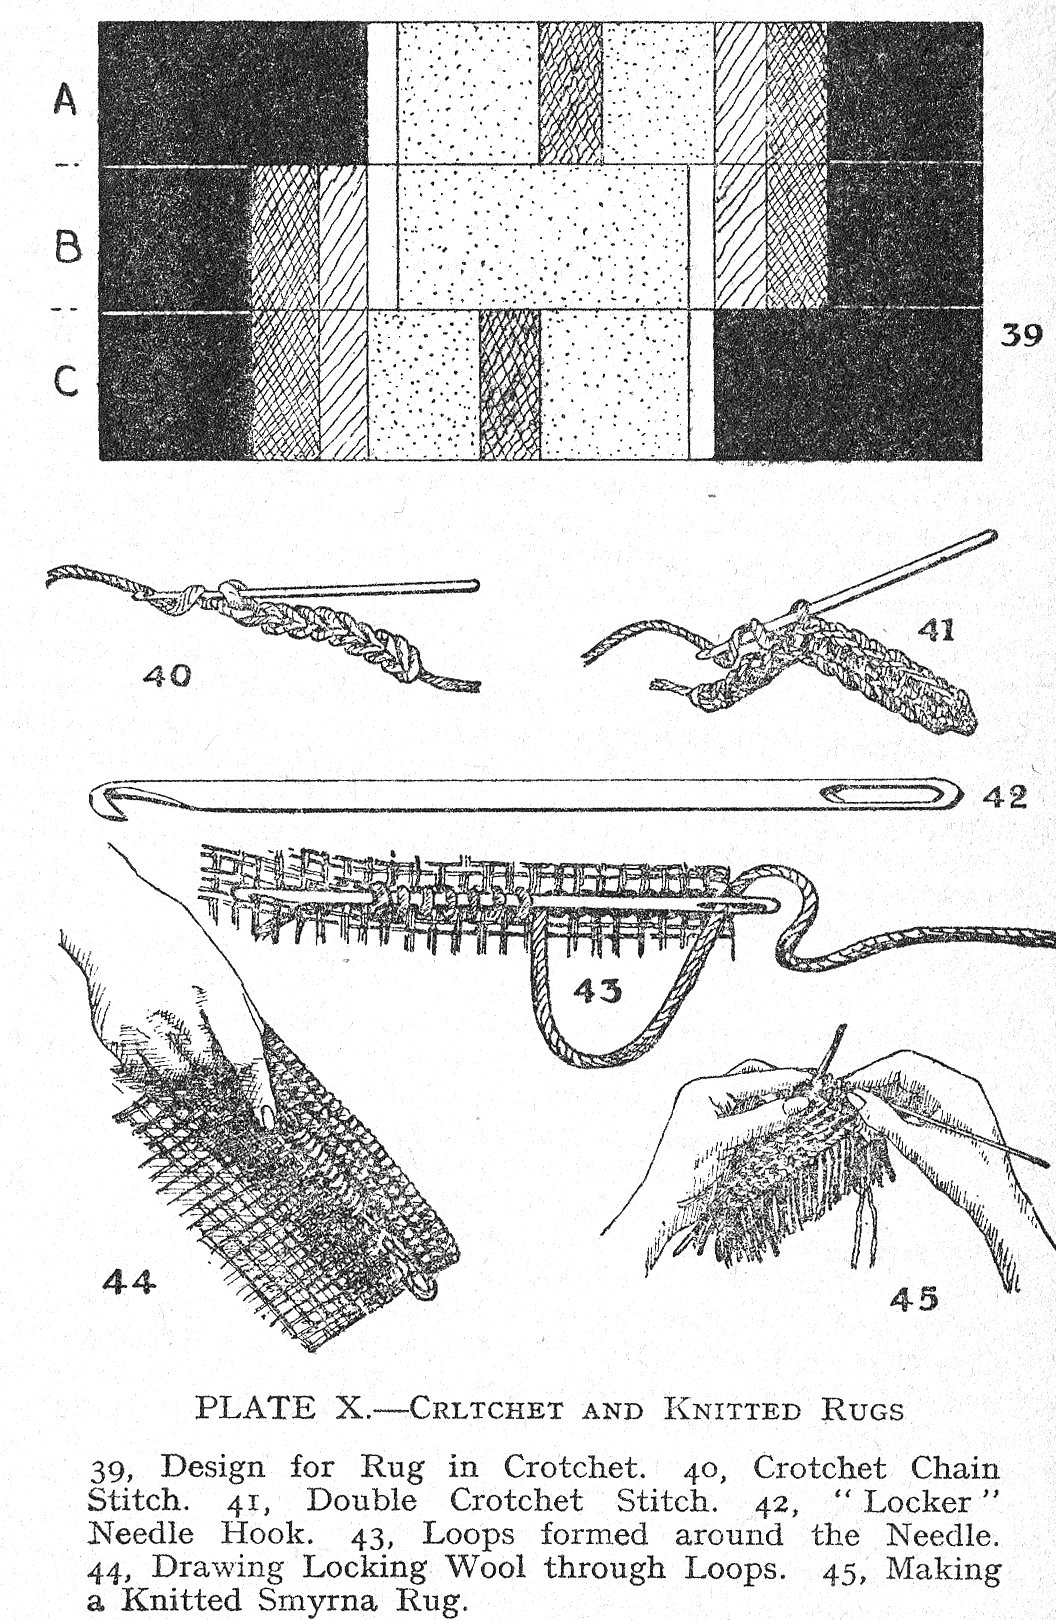
The simple design in Fig. 39 for a rug 30 by 60 inches in Turkey rug Wool, requires 2-and-a-half lbs. black; 1-and-three-quarter lbs. fawn; f lb. maroon; half lb. jade green; quarter lb. brown; quarter lb. yellow.
Counting from the top of the diagram and working from left to right the upper strip A consists of 45 rows black, 5 rows yellow, 20 rows fawn, 10 rows brown, 25 rows fawn, 8 rows jade, 12 rows maroon, 25 rows black.
The middle strip B, from left to right is 25 rows black, 12 rows maroon, 8 rows jade, 5 rows yellow, 50 rows fawn, 5 rows yellow, 8 rows jade, 12 rows maroon, 25 rows black.
The bottom strip C consists of 25 rows black, 12 rows maroon, 8 rows jade, 20 rows fawn, 10 rows brown, 25 rows fawn, 5 rows yellow, 45 rows black
Work this rug in plain double crochet, keeping the tension as uniform as possible and producing 22 double crochet to a width of 10 inches and 15 rows to 6 inches in depth.
When working, pass the hook under both stitches of the previous row; you will find that this makes the rug a good deal firmer. When you come to the end of each row work 2 chain stitches to make the turn and then miss the first stitch in the row that follows. To keep the number of stitches the same in all the rows you must make a stitch into the turning chain of the previous row.
To join on a new length of wool of the same colour lay the new wool on top of the work while you still have about 9 inches of the old wool left so that you can work the next 5 or 6 inches over the new piece of wool, then you lay the old wool on the work and continue with the new wool, which you work over the old in the same manner.
When you have to change the colour of the wool - crochet to the end of the row and cut off the wool, leaving about 3 inches overhanging and pull it through the last stitch. Work several rows with the new colour leaving about 3 inches overhanging at the starting end - then you can run these odd ends into the crochet of their respective colours.
CIRCULAR RUGS IN CROCHET
These can be worked with a centre in one colour and a border consisting of rings of contrasting colours, or you could work it in repeats of a series of colours. You begin at the centre with 4 chain stitches - then you work 2 double crochet into each of the four chain and after that you simply keep on working double crochet round and round.
To keep the work flat you must of course increase the number of stitches in each turn which you do by 2 double crochet into a stitch.
CROCHET STITCHES
Crochet chain stitch - abbreviated CH in most instruction sheets or charts is worked as in Fig. 40. by making a loop a little way from the end of the wool - then you make the stitch by inserting the hook below the wool which passes over your forefinger and drawing the wool through the loop required.
The double crochet stitch, Fig. 41, is worked on a foundation chain of the required length, then with a stitch or loop on the hook - insert it into the stitch of the previous row - thread over - draw it through the stitch that was lifted - thread over - draw it through both stitches at once.
THE LOCKER STITCH
A simple and effective crocheting lock-stitch can be worked with the "Locker" needle-hook, Fig. 42, patented and sold by John Kendall, of Maryport.
The locker needle hook is like a combined crochet hook and an ordinary needle - it has a hook at one end and an eye at the other. It is made in 5 sizes, No. 8 is used for ordinary rug work; No. 10 for finer rugs on special Locker-hook canvas with 16 holes to the inch. The smaller sizes are used for ordinary crochet and embroidery work.
To make a rug by the locker-hook system you must use a canvas and a hook of the correct size. For ordinary mesh rug canvas use 6-ply rug wool and reckon 4 ounces to the square foot, and No. 8 needle. For the locker-hook or small mesh canvas use the No. 10 hook and allow 4-and-a-half ounces of 6-ply wool, or about 3 lbs. of fine wool for a rug 27 by 54 inches.
First you wind the wool into a ball, then you thread the needle with the wool, push the needle up from below and through between one of the double bars of the canvas drawing with it a yard or more of wool which will be used for locking - and leave the ball of wool below the canvas. Take the hook in the right hand, push it down through the first hole of the canvas and with the left hand below - pass the wool over the hook and draw it up in a tight loop to the top of the canvas, keeping this loop on the shaft of the needle, repeat until there are some 18 loops or thereabouts, gathered on the needle, Fig. 43, then draw it forward through this row of loops, Fig. 44, pulling the locking wool through after it. If any of the loops have a tendency to tighten up too much, you remedy this by lifting the locking wool before pulling it tight. The resultant surface is very much like a Brussels carpet.
Most workers prefer to work from the left-hand corner - around the edge working outwards, designs should be worked first and the background filled in afterwards. When the locking wool is used up another long length is joined on by sewing, as this avoids knots.
Thinner wools - or those of a different colour can be used for locking - the thinner wool saves a little in quantity without any detriment to quality. Attractive "shot" effects can be obtained by using a thick locking wool of a different colour to the main wool.
KNITTED SMYRNA RUGS
Luxurious Oriental Smyrna type rugs can be made with a large darning needle or can be knitted with a pair of No. 13 steel knitting needles at least xx inches long. To knit such a rug, obtain some Smyrna rug wool - in the colours you desire, also Smyrna knitting cotton and an ordinary rug wool gauge.
Cut the wool into lengths as if for a deep pile tufted rug, then with the knitting cotton knit one row plain, casting on any uneven number of stitches, say 43, then for the second row make one plain stitch, then take a piece of the wool and knit it in with the next stitch. One half of the wool will thus come at the front and the other half at the back.
Make one more stitch, then bring the back half of wool to the front, Fig. 46, and knit it in. Continue in this way making first one plain stitch - then knit in the wool.
When the first row is complete knit one complete plain row, then continue as before by knitting in the wool - using whatever colours are required by the design. Knit your rug in strips of convenient width, then sew the strips together and clip the ends of the wool to make a level surface.
Ordinary designs can be worked to; each strip of wool knitted in to form a tuft counts as one small square on the design.
CHAPTER SIX - PLAITED AND OTHER RAG RUGS
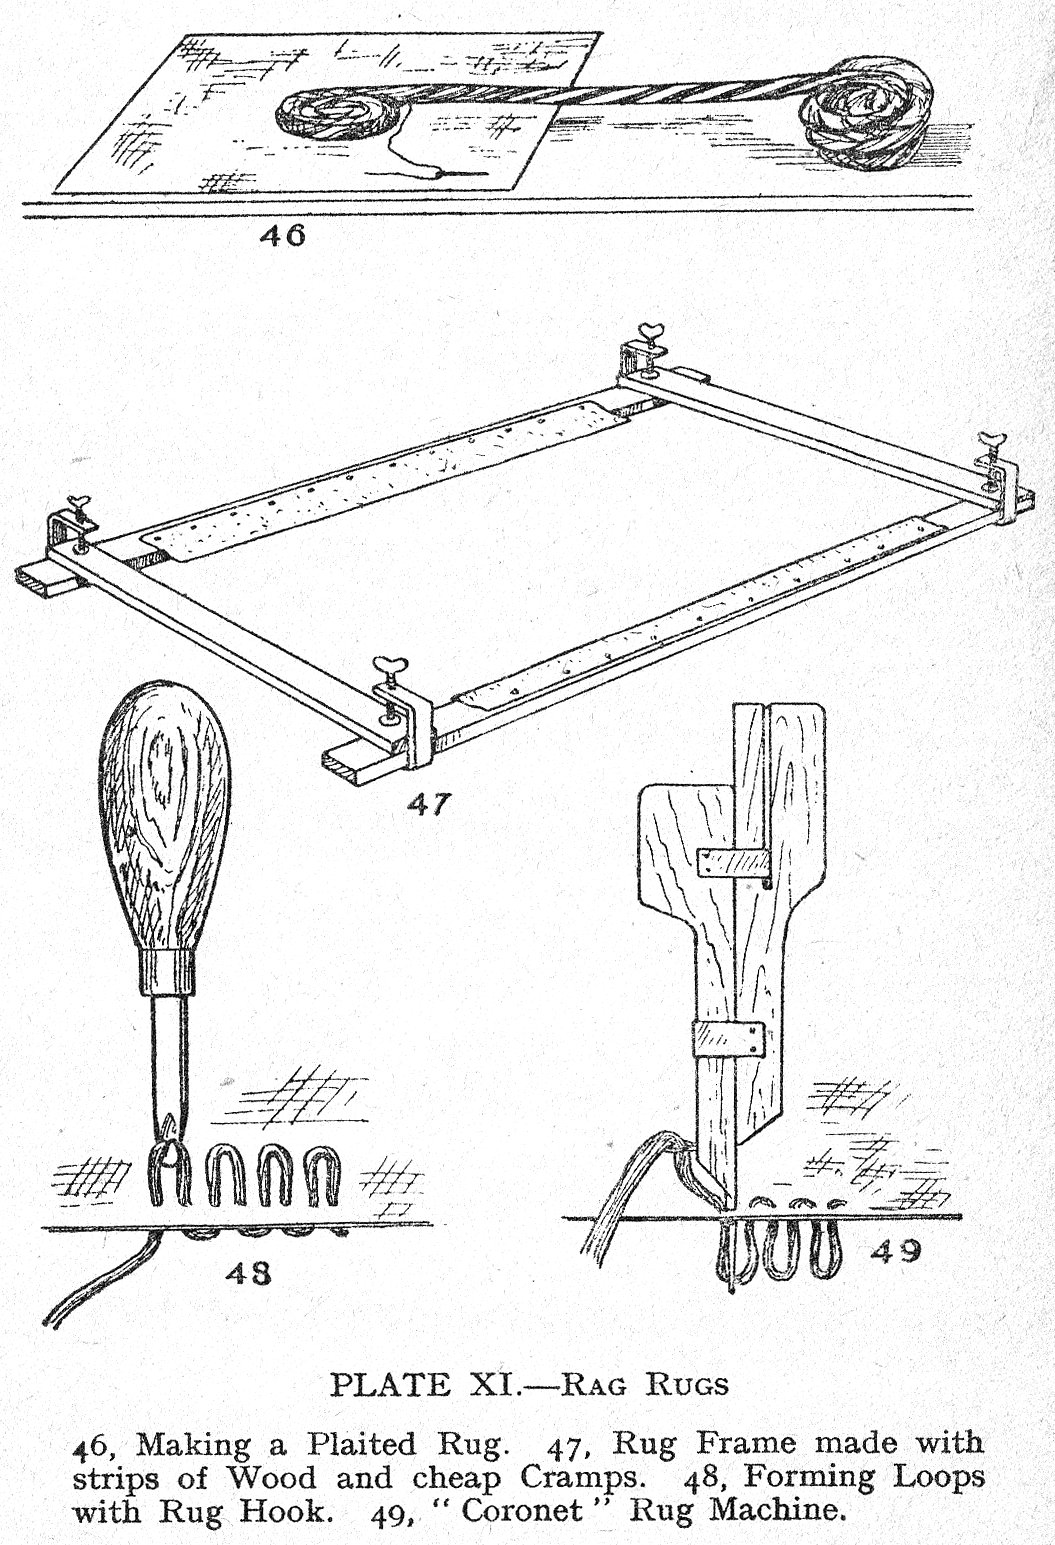
Practicable hard-wearing rugs can be made from old clean rags, odd pieces of dress materials, stockings and old shirts. Almost any unwanted cotton, woollen or silk materials around the house can be made use of provided they are clean. If you do not like the colour you can easily dye them to suit your requirements.
The first step is to cut or tear the material into strips about 2-and-a-half inches wide and preferably on the cross. Stockings should be cut round and round as this gives you a good long length.
PLAITED RUGS
Having prepared the strips, select those of suitable colour - say brown, yellow and green - then take a strip of each and sew the ends together - and then plait them in the usual way, taking care to preserve neat and uniform turns. When one strip is finished sew a new piece to it and continue the plaiting until you have made several yards.
PREPARING THE BACKING
Next cut a piece of Hessian or other firm material to act as a backing - fasten it to a table with drawing pins and chalk on it the outline of the desired rug - which can be oval, square, round, or any shape you may desire. For circular or oval rugs begin exactly in the centre, sew the end of the plait to the backing, then coil up the plait and sew it to the backing, Fig. 46, and to the adjacent turns. Rectangular rugs should be built up from the outside - commencing at one corner. Pull the plait taut to get it straight - hold it with a weight and sew it to the backing, then do the same on the remaining three sides and continue working inwards towards the middle, the last part being turned under neatly and sewn down. All turns should be seen as the work proceeds; take care not to pull the plaits too much - or they will contract and distort the rug.
MAKING RAG RUGS ON HESSIAN
Very nice looking rugs can be made on a Hessian or similar backing, using rag strips about a half inch wide, if the material is fairly heavy, and say three-quarter inch wide if very thin. These rugs are best made on a frame which is quite a simple affair and can easily be made by anyone.
To make a generally useful frame, Fig. 47, get two pieces of "prepared" deal 2-and-a-half to 3 inches wide, three-quarter to 1 inch thick, and 6 feet long, also two similar pieces 3 feet long. It will save you a lot of trouble and bother to buy four small metal cramps costing threepence each at popular stores.
Next take two strips of strong cloth about 4 inches wide and tack one on each of the long pieces of wood. Then put the four pieces together like a frame and fasten them with the cramps.
Next take a piece of Hessian or canvas - or a stencilled Hessian design - such as those known as Garretts Bluenose patterns which are specially printed for rag rug making and are obtainable from J. Kendall, 96, Crossby Street, Maryport, and sew the sides firmly to the cloth strips - also work your sewing threads over the cross pieces at the end of your frame.
The rag is then hooked into the canvas with a rug hook - sometimes known as a hookey-hook, or you can use a rug-making machine. In any case set the design side upwards, rest the frame across chair-backs or in any convenient way that will bring it to a suitable height.
When working with a rug hook take a strip of rag in the left hand and hold it beneath the canvas, then push the hook through, catch up the rag and draw a loop through, Fig. 48, making it about three-eighths inch to half inch high. Push the hook in again about two threads to the right and draw up another loop and so on until the rug is completed.
To save reaching over the frame when working on a large rug, slacken one side piece of the frame, roll the canvas around it and then clamp the bar in place again after drawing the canvas tight. You can use this simple frame for making other kinds of rugs, including the long pile rugs described in Chapter Two.
Instead of using the plain rug hook you can use a tubular variety known as the "Quikumak," which you work by threading the strip of rag through the eye of the hook and simply stab it through the canvas from the top, then you grip the rag on the underside and hold it while you pull out the hook and insert it again two or three threads to the right, the result is a row of loops on the underside of the work, which when completed becomes the pile or face side. The loops can be left plain, or may be cut as preferred - the back should be covered with Hessian or a lining material and bound with webbing.
MAKING RAG RUGS WITH CORONET MACHINE
A device known as the "Coronet" rug machine, Fig. 49, the cost of which is only about 1s., enables rugs and mats to be made with rag strips or coarse wool.
The next requirement is a suitable design, printed on Hessian, or you can chalk out your own, then you fix it to a frame, as described earlier, place the work upright in front of you and proceed to thread the machine.
The rag should be used in long strips and of a size to pass easily through the eye at the side of the machine and then through the eye of the needle.
Next, you hold the needle side of the machine in the right hand and the other in the left, then press the needle into the Hessian as far as it will go, then press down the other part of the machine also as far as it will go and hold it there while the needle side is drawn up, which completes one stitch and the machine then jumps automatically into position for the next stitch. Continue working in this way until the rug is completed, then paste over the back and apply a lining. Cut the loops and finish with a webbing binding.
This method of finishing off any rag rug is recommended as it ensures a durable, hard wearing article that will give long and faithful service.
CHAPTER SEVEN - FURNITURE AND APPLIQUE RUGS
Rugs already described in this book have been intended for normal home use on the floor, but there are many other directions in which rugs are legitimately and profitably used - for example - rugs for the car, or a small boat, rugs for use in the garden and delightful soft rugs that you can spread over a divan or Chesterfield. For garden use the rag rugs described in the previous Chapter are quite good - but if you want a hard wearing, inexpensive but softly attractive garden rug for the hammock, or for reclining try one made of felt with a few applique ornaments, or a simple pattern worked in cross stitch.
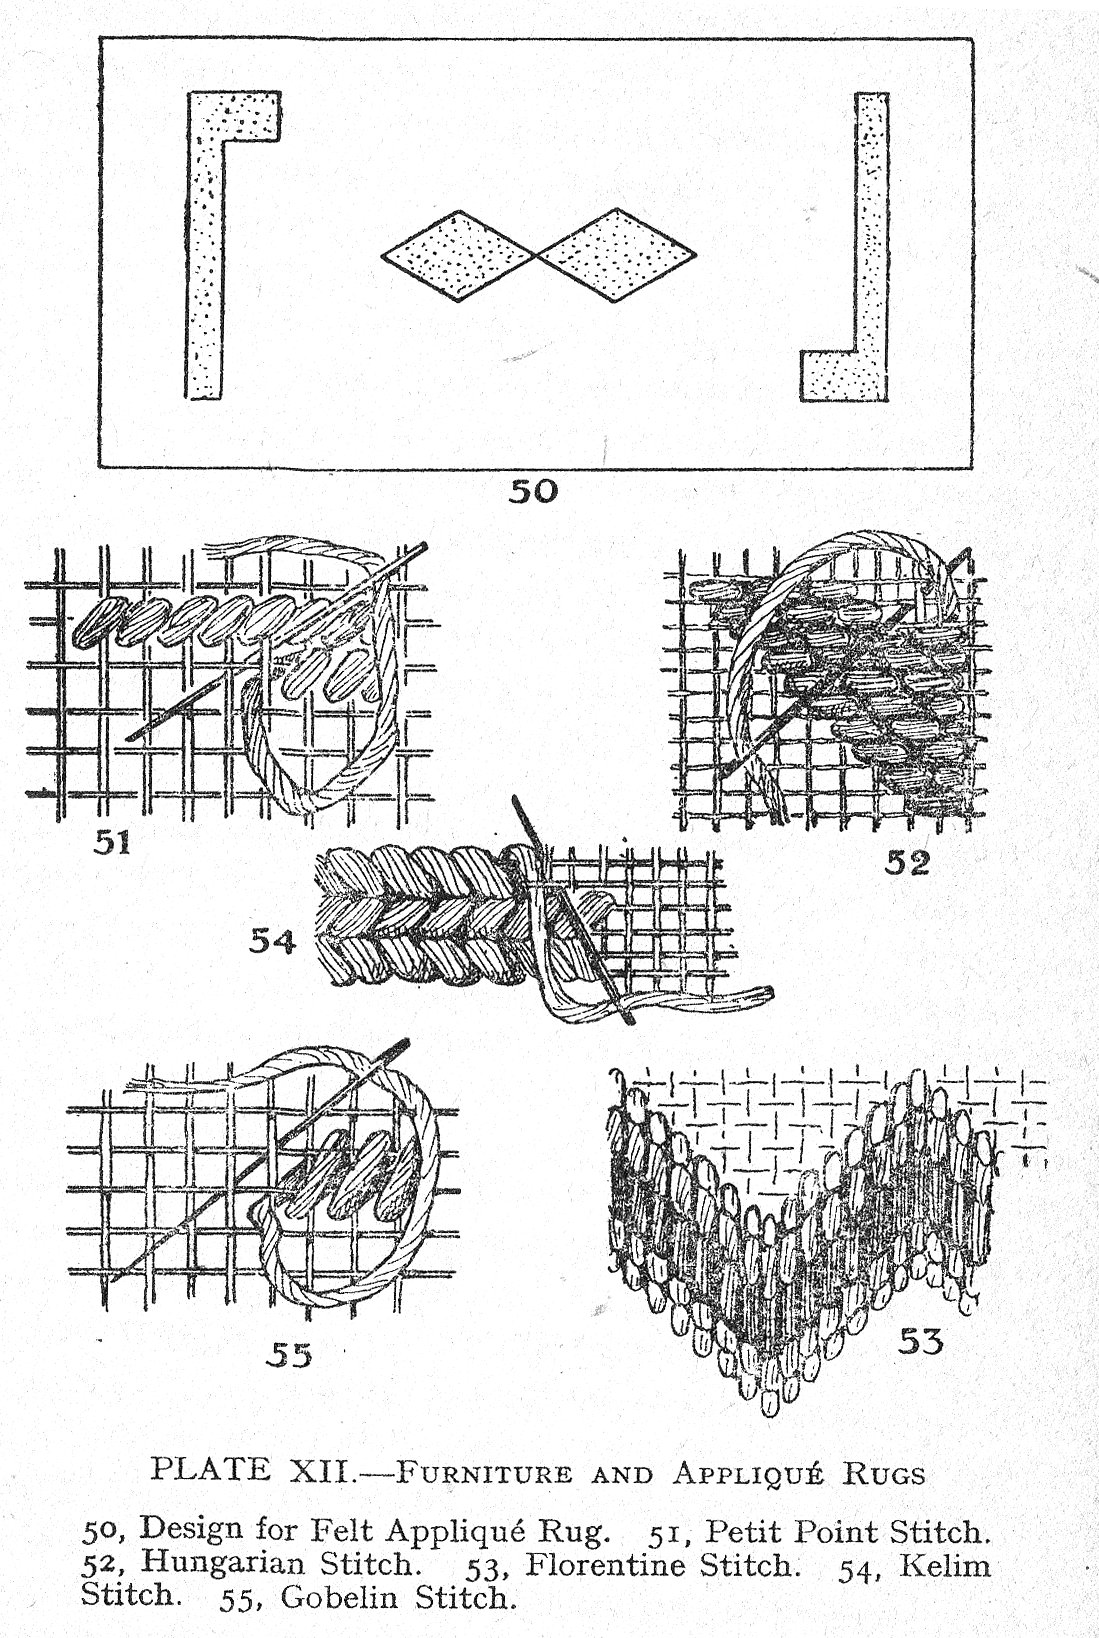
FELT APPLIQUE RUGS
Felt - obtainable from house furnishers - is generally 36 inches wide and is sold by the yard. There are some 20 or more colours to choose from - the material is firm and smooth in texture, is nonfraying and is eminently suitable for rugs and for applique work.
To make an applique rug obtain a sufficient length of felt, also a few "remnants" or odd pieces, which are often to be had in small bundles of assorted colours at nominal cost. The only tools you will require are a sharp knife for cutting and some fairly stout needles.
Select a simple bold design, Fig. 50, then cut the large piece of felt for the background or foundation. You can cut it with scissors, but much better results one obtained by using a sharp knife, which you should guide with a long, straight piece of wood to ensure a really clean straight edges. On the curved work you should also use a knife for cutting unless the pieces are small and can be cut with one single sweep of the scissors.
Next prepare ordinary paper or thin cardboard patterns for the shaped pieces, then lay them in position on the felt, chalk around them and cut out these pieces, taking care to get them a good shape.
The next step is to sew these small decorative pieces to the background, using the ordinary hem stitch, or the blanket stitch - which is especially suitable for felt applique work - or, of course, you can use almost any of the embroidery stitches. In some cases you will find it helpful to tack the appliques into place, but the great thing is to keep the work flat all the time.
The sewing thread can be thick "glove" lustre silk, embroidery wool, or any suitably coloured thread that takes your fancy. With a very little experience you will be fascinated with this out of the ordinary method of making rugs, and will find that by piercing the felt appliques you can get some exceedingly fine effects.
FURNITURE RUGS
Rugs for use over furniture ought to be very soft and pliable, for which purpose you can make them on some of the finer mesh rug canvases, or you can use a moderately stout embroidery canvas and make your rug with tapestry wool or with thick embroidery wool, while very rich lustrous effects are possible by the use of artificial silks or rayon thread.
So far as the actual working is concerned you should by now be able to make a fine grade rug by the tufted pile systems described in Chapters Two and Three, or if you prefer a smooth surface you obtain marvellous results by means of the simpler embroidery or tapestry stitches. The first attempt at this class of work should not be too large, but it may be as elaborately patterned as you please.
Next select a canvas which can be a fairly coarse embroidery canvas, or a fine rug canvas, for example, the "Old Glamis" Helvellyn rug canvas, which is available in three widths of 12 inch, 27 inch and 36 inch wide.
On this canvas you can draw your own design in colour, or you can obtain one ready printed - alternatively you can follow any ordinary rug design so long as you make the appropriate allowance for the stitches and the reducing effect of the finer mesh canvas as explained earlier in this book.
SUITABLE STITCHES
Any of the ordinary rug stitches, including the cross stitches described in Chapter Four, can be used for this class of rug work, but some very pleasing effects are possible by using "single thread" canvas and working entirely in "Petit Point." This you work from right to left, Fig. 51, so that all the stitches slant upwards and to the right, the stitches being made over one cross of the canvas. A similar stitch known as "Gros Point" can be worked on single or double thread canvas, and covers two threads in width and height.
HUNGARIAN STITCH
A simple stitch, economical of material and excellent for. backgrounds, it is worked, Fig. 52, in diagonal rows over two horizontal threads. The stitches are made by inserting the needle below the two threads and bringing it out to the right, which results in diagonal rows of horizontal stitches. A somewhat bolder effect is obtained by reversing the direction of stitching so that the stitches are vertical, although still arranged in diagonal rows.
FLORENTINE STITCH
This is a decorative stitch, Fig. 53, generally worked to form chevrons of different colours. The stitch is set vertically, but each successive row varies in length with the colour. Each stitch in any given colour is always the same length, but each colour is worked to a different length to cover say three, four or five threads.
KELIM STITCH
Sometimes called the knitting stitch, Fig. 54, is worked like the first half of a cross stitch and covers two horizontal threads and one vertical thread, the best effect being obtained by working successive rows in opposite directions, which produces a twilled or herringbone appearance.
GOBELIN STITCH
This stitch, Fig. 55, is very similar to Petit Point, but the stitches are worked to slant over one thread in width and two in height, consequently the stitches do not incline at quite the same angle as in Petit Point. The Gobelin stitch can also be worked as an upright stitch, which is helpful for some kinds of background.
A little experiment with these various stitches on an odd piece of canvas, and all worked in the same colour will show you conclusively that the textural effect of the finished work is greatly affected by the direction, shape and method of working the various stitches, also that you can get remarkable effects merely by thoughtful choice of stitches.
These results are largely due to the play of light and shade; the resultant shadows being different with the various modes of stitching.
CHAPTER EIGHT - SIMPLE WOVEN RUGS
This Chapter will serve to introduce you to the fascinating and ancient method of weaving rugs on a simple frame loom. The intricacies of weaving are far beyond the scope of this book, but by following the instructions here given you can weave a very effective rug that when finished will give you lasting satisfaction
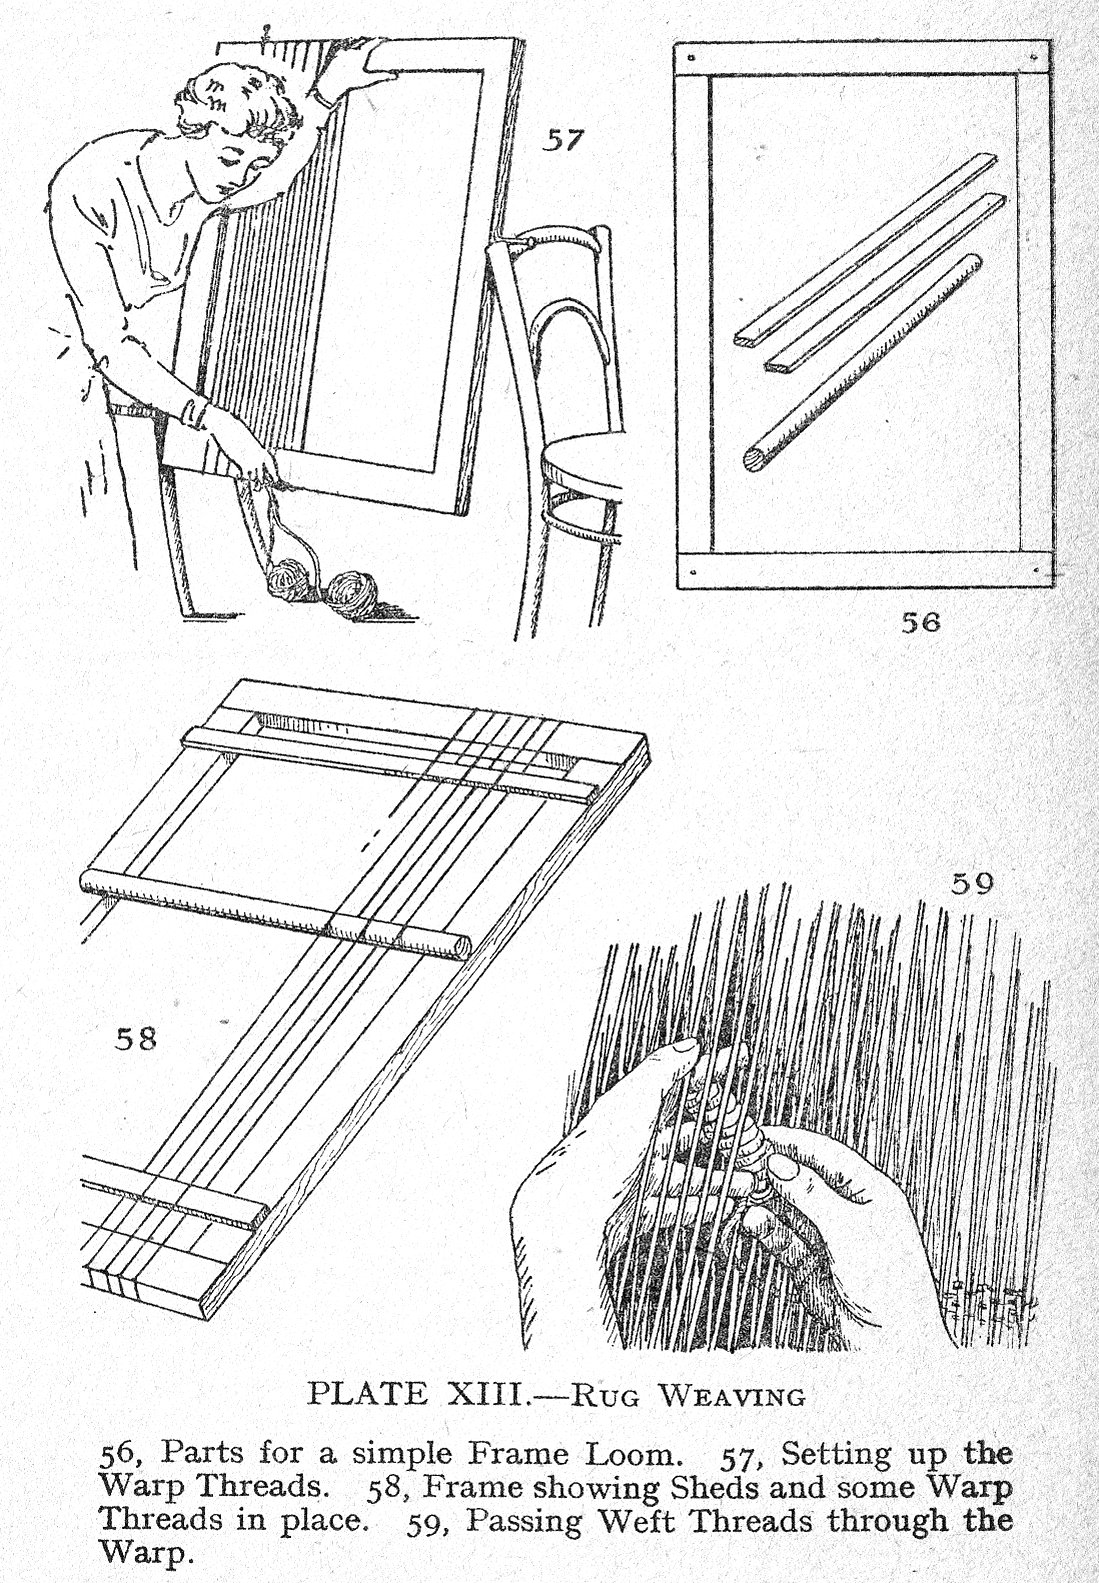
MAKING THE FRAME
A serviceable frame loom, Fig. 56, can be made from a large picture frame from which the glass and backing has been removed. The frame should preferably be plain, and it must be reasonably strong; alternatively you can make a wooden frame from four pieces of smooth wood securely screwed together at the corner joints. Other materials you will require are one piece of smooth wood, as wide as your frame and about. 1-and-a-half to 2 inches wide and half inch to three-quarter inch thick. Also two laths about 1 inch wide and a quarter inch thick, and a broom handle - all as long as your frame is wide.
A strong widely spaced toothed comb, half lb. fine flax thread or a ball of soft thin string, and a supply of ordinary rug wool in selected colours.
You commence by setting up the warp which you accomplish by making notches with a penknife along the short sides of the frame, spacing the notches at equal intervals and about 3 to 1 inch.
Next you drive strong nails into the centres of the long sides of the frame so that you can rest them on chair backs, Fig. 57, so that the nails will act as axles and enable you to swing the frame over.
Next you take the fine flax thread and use it double, which you can best do by winding the thread into two separate balls, then tie together their two ends and fasten them to a tack at the top left hand corner of the frame, then rotate the frame and wind the two threads into each notch and fasten off at the bottom right hand comer. This forms the warp.
The next step is to make the "shed" or opening through which the weft threads pass. This you do by taking one of the thin laths and work it across from one side of the frame to the other, so that it passes over and under alternate double threads, then push the lath as far as it will go towards one end of the frame. Then put the other lath alongside the first and push it to the bottom of the frame.
Now take the broom handle, or any round piece of wood about 1 inch diameter, and work it across the warp to form an opposite "shed" - that is you work the stick over those threads that come on top of the laths and under those threads that are underneath the laths. Fix this stick about 9 inch or so from the top of the frame by means of cramps or nails driven into the frame below the stick, Fig. 58.
WEAVING
Having prepared the loom in the foregoing manner you must next wind some string into long compact bundles, and similarly prepare the wool for the weft, then you can commence weaving by resting the top part of the frame on a table, or across the chair backs as before, while you support the lower part of the frame on your knees.
You weave the first row by passing the weft string through the opening made by the stick, Fig. 59, moving it forwards a little at a time with the fingers, leaving the starting end of the string overhanging a few inches at the side, turn it around the outer thread and weave the second row by picking up the alternate threads and passing the weft under them - a few at a time. Weave about half inch of weft string in this way to make a firm end, and with the comb "beat up," or press the weft threads very closely together.
Then proceed to weave the wool weft; leave an end of wool hanging at the start, which you can darn back neatly when the weaving is finished, then weave the weft over and under alternate threads as was done with the string weft.
The thickness of the rug will depend on the wool you use, for a very thick rug you can use the wool double instead of single, but in any case as the weaving proceeds beat each row closely to the last with the comb.
For a first attempt you should weave a rug in bands of colours at right angles to the long edge of the rug, which simply means that you start weaving with one colour and continue until a sufficient depth has been reached, then you weave the next colour and so on.
WORKING A PATTERN
To weave a pattern is rather more difficult, and for this you should prepare a design on squared paper exactly the size of the finished rug. On this you draw in water colours or indelible crayon the outlines and colours of the design, then you fix it between the front and back threads of the loom.
This enables you to see at a glance the exact depth and width of the different elements of the pattern. Remember that if you use three double threads to every inch width of your frame the 1 inch squares across your paper will represent three warp threads.
The exact procedure varies a little with the design, but in general you weave right across where the design shows a continuous band of colour, then you weave the centre part of the design taking in, say, the centre 13 threads only, and weave for a depth of an inch or so. Next you weave the pattern at the sides for a similar depth and leave the ends of the wools hanging so that you can continue with them when weaving the adjacent parts. In this way you gradually work the weaving to a level edge and are able to start again or to continue in a similar manner. You can weave in this way rugs of any length within the limits of the frame, but when you reach the end weave a half inch band of string weft to strengthen the end. Then cut the warp threads 3 or 4 inches long and knot them together in bundles of 2 or 3 threads to form a fringe.
The warp threads should be chosen in some colour that will blend well with the design, especially as a coloured fringe very often looks better than one in "natural" colour.
During the weaving you will of course move the stick from time to time, and if the warp gets slack you tighten it by inserting a piece of wood or a thick stick under all the warp threads at the back of the loom, so that the stick by pressing on the frame pushes the threads outwards. You must also be careful to keep the weaving a uniform width, which you can do by fastening the outer edges of the weaving with pieces of string tied tightly to the frame and so adjusted that they keep the weaving nice and straight. You should fix these strings every 2 or 3 inches apart as you work on the weaving. You should always try to keep all the weft threads as straight and as evenly tensioned as you can so that when completed your rug will present a neat, compact and workmanlike appearance.
CHAPTER NINE - RUG DESIGNS
Ready made charts and designs, as well as designs stencilled on canvas, enable anyone to make splendid rugs, but there are times when you will feel that you would like to design your own rug - and this Chapter tells you how to set about the task.
First you should obtain some paper ruled in squares of 8 to 1 inch in each direction. This you can get for a penny or so per sheet from most stationers and artists’ shops.
Fix the sheet of paper on a flat board. Next you must decide on the method of making the rug, and then upon its width, which for practical purposes should be one of the standard canvas widths. It is just as well to make up your mind which make or brand of wool you will use and to employ the same make throughout, otherwise you may have trouble in keeping a uniform thickness of pile.
Ordinary "one-eighth" squared paper has the "inch" squares defined by rather thicker lines which correspond to the coloured lines on "check" canvas, as described in Chapter One, consequently each of the thick lines on the drawing paper represent a coloured strand on ordinary check rug canvas.
THINKING IN SQUARES

The next thing you must do is to learn to "think in squares," because when you make a rug you are necessarily limited by the number of holes or "squares" in the canvas, and each of these separate holes is represented by a separate one-eighth inch space on your design, Fig. 60, and can only have a single colour or a single tuft of an ordinary pile rug in any one of these holes; therefore, for so long as your design is composed only of horizontal or vertical lines they will be smooth and straight on your chart, but if you use diagonal lines, or curves, they will have to be drawn and worked in a series of little steps as can be visualized by the examples in Fig. 61.
Having made up your mind as to the width and length of your rug, count the number of check squares on the width of the canvas, which if it is 27 inches wide will have 12 squares, and if 56 inches long will have 24 squares measured lengthways of the canvas.
Therefore, count off 12 squares on your paper and draw lines to represent the outer width of your rug, then count off 24 squares and mark off the ends of your rug. Now within these limits you can draw any pattern that takes your fancy, indicating it lightly in pencil. This done, proceed to fill in the various small squares either with water colours or crayons, remembering always that each single small square must be filled by one colour only, and that curves must be worked in steps.
Had you chosen almost any other width of canvas, say 18 inch, you would have found there was an odd number of check squares, in the case of 18 inch canvas there would be 7 large squares. When this is the case you must begin at the centre line, Fig. 62, which must come midway between the 1 inch or large squares on the paper, then you count off 3-and-a-half squares each way from the centre line and then draw your border lines as before.
Similarly, if the chosen length gives an odd number of squares, say 15, you must draw another centre line at right angles to the first and count off squares each way to find the points where you have to draw the lines representing the ends of your rug. Thus you now have on the drawing paper the exact outlines of your rug, and each of the small squares on the paper represent one hole in the actual piece of canvas, and you are now able to work out any design you please, following your own special ideas or basing your work on the accepted laws of artistic composition.
REPEAT DESIGNS
When a design is symmetrical there is no need to draw the whole of it; all that is required is one complete section which may be one-half, or one-quarter of the whole, the rug being completed by repeating the design as many times as may be required.
When you have several different colours in a design you can estimate the approximate quantity of wool required by reckoning that one ounce of wool will be required to fill 160 holes, but there is no need to reckon less quantities than 4 ounces, because that is the minimum quantity of wool normally sold.
ADAPTING A DESIGN
Sometimes it is desired to adapt some feature of a design to another purpose, or to amend the shape. One good way of doing this is to trace the outlines of the selected parts and transfer them to the new design. Varying the proportions of the border will often be found helpful in altering the size of a rug.
Still another way of adapting an existing design, say for example a circular pattern. This can be used as the centre piece of a circular rug with a border of concentric bands of colour. Alternatively it could form the centre piece of a rectangular rug, and could partly overlap a simple border.
In fact there is limitless scope for the home worker to evolve original designs for any class of rug, and by following the instructions in this book to produce distinctive rugs possessed of an individuality and charm that time will never efface.
W. Foulsham & Company Limited was founded by William Foulsham in 1819.
This was an early book (No. 8) in the "Foulsham's Practical Manuals," a series of "How To" paperbacks published by W. Foulsham & Co., Ltd between 1928 and 1952, and some of the content was later included in "Home-Made Rugs and Leather Work" by Mary Bolton (1957), a hardback published by W. Foulsham & Co.
The same publisher produced the "Foulsham's Pocket Library" series ("Foulsham's Cloth-Bound Pocket Library"). Some of the titles in this series were also published previously, or simultaneously, by other publishers in Canada, South Africa and Australia and several of the titles reprinted by Foulsham were from the 1890s – pre-WWI.
The Foulsham’s series ranged from crafts to book-keeping, etiquette, driving, making cocktails and keeping a dog healthy and Old Moore’s Almanack.

You are visitor number: