|
Keeping the camera steady will prevent camera shake which will make a photo blurry. Keep yourself steady by: |
||
|
|
||
|
using your leg as a support |
lying on the ground |
resting the camera on something stable |
THE KEEP IT SIMPLE GUIDE TO PHOTOGRAPHING YOUR CAT
Hints and tips on taking simple photos of your cat. Originally written for Cambridge CPL Newsletter in the 1996.
Since this is a simple, non-technical guide on taking snaps of cats, I'm not going to get bogged down in jargon. If you have an SLR camera (the manual knobs and dials sort of camera) you probably know how to use it anyway. If, like most owners, you have an automatic "point and click camera" it does most of the work for you, but there are just a few useful terms you need to know:
|
Artificial Light: indoor light bulb/fluorescent light Automatic: point and click camera, it does all the focussing and decides when to use flash. Exposure: brightness of the photo One that is too bright is said to be over-exposed one that is too dim is underexposed Focus: sharpness of the subject in the photo. A blurry subject is out-of-focus Automatic cameras will produce blurry pictures if you get too close so check your owners manual to see how close you can safely get Most recommend you don't get closer than 2 feet. Green-eye: the catty equivalent of red eye where the eyes glow an eerie colour. SLR: A knobs and dials camera where the photographer has to do all the hard work. Natural Light: daylight or the light from a "daylight light bulb". Shutter: in the context of this guide, it's the button you press to take the photo! If you want to get technical, it's a moving shutter that briefly exposes the film. Viewfinder: the bit you look through! |
WHAT FILM DO I USE?
This won't be an issue if you are using a digital camera, but many people still use film cameras. For some photographers, the reason for using film is to prove that they own the photo.
The best all round film is 200 speed. It works well outdoors and indoors. 100 speed film is good outdoors in bright sunshine, but less good indoors. 400 speed film is good for indoor photos or fast action shots, but is more expensive and many automatic cameras can't cope with it. 200 speed film lets you follow your subject as he moves from sun to shade. Don't worry if you can't afford expensive main brands; Konica, Sainsbury and Tesco brands are cheaper and just as good. If you buy in bulk, you can store unused film in a cool place, like the fridge, to make it last longer.
Many films have a colour bias, that is they are more responsive to either reds or to blues. Personally I find Kodak too reddish and I prefer Fuji and Konica; but you will have your own preferences. For black and white photos, the main brand is Ilford. Some of these films are designed to go through an automatic photo-developing machine and are not truly black-and-white - the grey tones end up cream-tinted or blue tinted and the black generally comes out dark grey. Properly developed black-and-white photos can look stunning so it is best to find a specialist developer to process them rather than put them through the automatic process. Black-and-white negatives can also be used to make sepia prints.
If you are using a digital camera, you need to consider image resolution. Most digital cameras allow you to switch from standard resolution to high resolution; some have several different resolution/quality options available. High resolution images give better quality, especially if you want to enlarge sections, but take up more space on a memory card. Low resolution allows you to cram more photos onto a memory card, but they store less of the fine detail. It's worth experimenting to see how the different resolution photos look on screen or when printed.
Technical stuff over, let's talk about taking photos.
LIGHTS, CAMERA, ACTION!
Before you start, make sure the camera has film in it and the batteries haven't gone dead and clean the lens with a soft duster. There is nothing worse than finding you're out of film, the flash doesn't go off or the photos are poor because the lens was grimy.
|
Keeping the camera steady will prevent camera shake which will make a photo blurry. Keep yourself steady by: |
||
|
|
||
|
using your leg as a support |
lying on the ground |
resting the camera on something stable |
Most automatic cameras focus on whatever is in the middle of the viewfinder. If your cat is off-centre it will be out of focus and you will get a beautifully focussed picture of the background and a fuzzy cat. Get close to your subject, but not so close that the camera can't focus. The best distance is two to four feet away from the cat, otherwise the cat will be too small in the photo. Your cat is the star of the photo, not the surroundings! Make sure the subject of the photo is framed in the viewfinder and not too close to ally of the edges as the extreme edges don't appear in the printed photo.
When your cat loses interest, stop taking photos. Don't force him to pose as he will start avoiding you whenever he sees you with a camera. It's best to photograph him doing what comes naturally rather than making him pose especially for the camera.
OUTDOOR PHOTOS
It's easier to take photos outdoors as you're not likely to need flash. Don't wait for your cat to pose and then rush indoors to grab the camera as he'll have moved by the time you get back. Pick a day to do some photos and carry a loaded camera around with you. Find out where your cat likes to sit as he will pose best in a familiar spot.
Clear away any obstacles such as in-the-way flowerheads before you start clicking. Talk to the cat so he looks at the camera and most of all, be patient! Get down as close to his level as possible otherwise the funny angles can make him look decidedly odd. Most cats like to sit in flower beds and flowers or foliage make a good natural background. You could cheat though: find a prop for him to investigate. Anything will do - a pile of flower pots, a watering can, some catnip scent rubbed onto a branch, etc - as long as it is novel enough for him to be curious about. That will give you plenty of time to move around and get a nice photo. Attract his attention now and again so that he looks at the camera.
Don't take just one photo, take a couple in case one doesn't come out too well. Taking a photo of a cat sitting on a fence with only the sky for background is more difficult. The camera sets its exposure for the brightness of the sky and the cat appears as a silhouette. Unfortunately there's not a lot you can do to prevent this with an automatic camera. If the camera allows you to switch the flash on manually, you can use the flash to light up the front of the cat. Or you can stand on a stepladder and get something other than sky in the background. Otherwise it's best to avoid this sort of shot. The same goes for photos of cats in the snow.
Another problem is taking photos of black cats. Unless there is plenty of light shining on the cat, he will end up looking like a featureless black blob. You need to get quite close to a dark-coloured cat so that the camera can set its exposure for the cat and not the background.
The best times for taking photos outdoors are midmorning and mid-afternoon when there is plenty of light but the sun isn't so strong it makes the photo looked washed out. Slightly cloudy days are also good as the sun won't be too strong. Dawn and dusk will probably be too dull for good photography unless you have flash.
INDOOR PHOTOS
You need to get as much light indoors as possible or the photo will be dim and indistinct. The best way to do this is to hook back your curtains and let the daylight in. Light bulb light will give the photo a yellowish tint (you can get blue filters that fix to some cameras to correct for this). Indoors is usually darker than outdoors, so make sure the batteries are fresh or the flash won't work. If your camera uses flash, give the flash time to recharge between shots. Otherwise, choose a time when the sun is shining into the room or midday when the light is good.
Most cats have favourite places to sit and if the room is well lit this makes photographing him easier. Green-eye or red-eye is only a problem if your cat is staring at the camera when the flash goes off. The light from the flash is reflected by the back of the cat's eyes, creating a weird glowing effect. Unless you want him to look like Dracula, ask someone to attract his attention so he looks slightly to one side. If you haven't got an assistant, you can use a fishing rod style toy to attract his attention to one side. Unless you want the toy or your friend to be in the shot too, keep the camera pointed at the cat and make sure the distraction does not appear in the viewfinder.
FLASH PHOTOGRAPHY
Eric Gottschalk offers a suggestion when using a digital camera indoors. Try disabling the flash and just utilise the room's normal lighting as modern digital cameras will usually compensate for low light situations with good results. If you have photo editing software, the photo can be further enhanced using the colour balance and gamma functions. The benefit to this is that your cat will not become disenchanted with the camera blinding him while you repeatedly try to convince him to look at you for "just one more shot". Eric writes "The cat doesn't know what a photograph is, so he probably just thinks you're getting your kicks by pranking him with your hi-tech toy of temporary blindness." With the flash disabled, the camera will be ready for the next shot in much less time and battery life will be considerably longer.
Another good use for a digital camera, though it requires 2 people, is to inspect a cat's teeth and gums by having someone take some photos from several angles while another person opens the cat's mouth. This can be faster and less stressful than trying to inspect the cat's teeth in the conventional way.
Reflector-eyes aren't the only problem with photographing cats. White fur also tends to reflect a flash, causing overexposure and turning a white cat into a blinding white blur.
|
Fatty - flash photo showing reflector eyes and reflector fur. |
Fatty - flash photo showing reflector eyes. |
|
|
|
Left: Fatty - no flash, using ambient light indoors.
Photos by kind permission of Eric Gottschalk and "Fatty" the cat. |
|
SIMPLE SETS
All you need for a simple set is an old curtain or similar amount of fabric, some drawing pins and a cardboard box or table. Move the box or table against a wall. Drape the curtain across it and pin or tape the upper edges to the wall. You can then put props on this set to keep your subject interested.
|
A SIMPLE SET |
You can make your set indoors or out, just as long as there's something to pin your curtain against and plenty of light. Find a backdrop which provides good contrast with the cat's fur, but don't use very strong colours as this will reflect off his fur and turn him a strange colour. White is not a good colour either as you could end up with the silhouette effect. Choose a soft colour - beige, blue, green etc. Strong colours are okay if the cat is dark coloured as it helps the camera work out the exposure.
Let your cat investigate the "set" and give him a toy to play with or a basket to sit in while you get down to his level and take the photos. Some cats need a few hours or a day to get used to a set, so leave it in place until he sits there willingly - you can try bribing him with food. Sets are a good way to take Christmas photos - you can decorate the set with tinsel or foliage. For Easter photos use cut daffodils etc. Believe it or not, the best Christmas photos are taken in summer when the light is good!
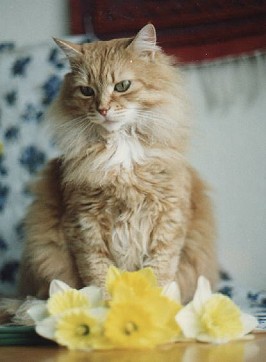
A simple set using daffodils |
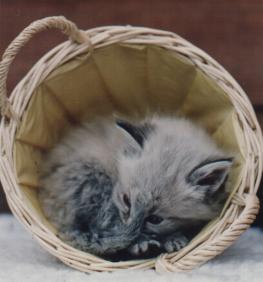
Or just give a kitten a basket .... |
ACTION SHOTS
Photos of cats climbing trees or playing are all very well, but they will be blurred if the cat or the camera moves when you take the photo. Be patient and take the photo when he slows down to catch his breath. Cameras which wind on automatically make it easier to take action shots; take three or four photos in quick succession as this gives you a better chance of getting at least one which comes out well. You could ask someone to dangle a feather for him so that he "dances" on his hind legs to catch it, most cats will hold this pose for a second or two.
If your camera takes fast film (400 speed), this will help with action shots as the film is exposed for a shorter time. SLR cameras will take even faster speeds e.g. 800 and 1600, but the faster the film, the grainier the image will be.
PEOPLE AND CATS
If your cat is in the mood for being picked up and cuddled this is easy; just make sure there is good lighting. Some cats don't like being picked up and will struggle and scratch, which doesn't make for a good picture. In photos with cats and people or several cats together, the cats will look smaller in order to fit everything into the picture. Make sure the picture is framed nicely in the viewfinder before you start clicking away and reward the cat(s) with some titbits.
MY CAT WON'T STAND STILL FOR HIS PHOTO!
Some cats are placid and will sit for hours while you take photos. Others will give you the runaround. If you feed your cat before his photo-call, he will be much more inclined to sit still and do other photogenic things such as wash his face. If he has a definite afternoon nap time you can catch him when he's dozy!
Kittens are harder to photograph as they are the most active. Catch them when they have more or less worn themselves out. That endearing Whiskas picture of a kitten sitting in the hand probably took days of training with treats and several rolls of film to get right! Kittens love to investigate things such as boxes and baskets, so find a well-lit spot without too many background distractions, give them some boxes to play in and be very patient. To get my photos of kittens in baskets and tinsel I put treats inside the baskets and spent hours sitting waiting for just the right moment and used at least 4 films. You can't rush a good photo.
POST-PROCESSING
There is a wide range of photo-editing software. These packages allow you to edit your photos on a computer. It is possible to adjust focus, sharpness, contrast, brightness, colour balance, red-eye etc and to touch up imperfect pictures (very useful if the physical photo is damaged or the negative is scratched). Some packages allow you to do more advanced editing.
FINALLY...
Out of every three photos you take, only one is likely to be a real cracker. Professional photographers take hundreds of photos, but at the end of the day only one or two will be just right. Of course they are much fussier about what they want. Don't worry if not every picture is perfect. To get a good photo for your website or animal charity snapshot competitions you need time, patience, bribes, good light, plenty of film (or space on a memory card) and a little bit of luck!


